
点击 蘑菇云创造 关注我们
无线行空板, 远程控制人脸追踪的麦轮小车
一. 项目介绍
行空板与麦轮小车!想象一下,你可以坐在家里,不用繁琐的线连接电脑,不用趴在地上调试小车,优雅地通过网络远程控制行空板和麦轮小车,实现对人脸的追踪和调控。

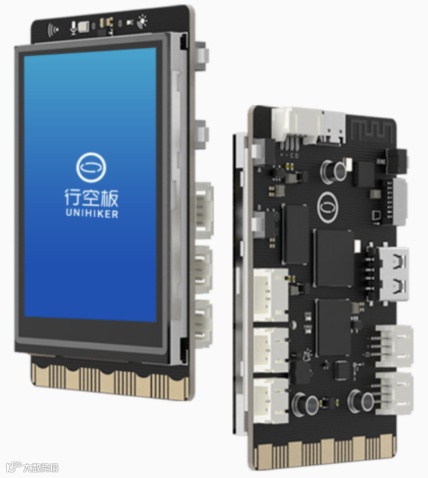
1. 行空板介绍
首先介绍一下行空板。它是一款专为Python学习和使用设计的单板微型计算机。这意味着只要你的手机、电脑、平板等设备能够与行空板在同一个网络中,就能通过网络访问它。行空板不仅集成了LCD彩屏,让你可以直观地查看数据,还具备WiFi和蓝牙功能,方便与其他设备连接和交互。此外,行空板还内置了各种常用传感器,可以感知周围的环境。
行空板因为具有WiFI可以无线调试,可以通过GPIO控制电机驱动,同时有屏幕可以显示状态,因此适合作为本项目的主控。
2. 麦轮介绍
可以全向运动的麦克纳姆轮(Mecanum Wheel),可以实现在狭小空间内,进行灵活转向移动的功能。相较于普通车轮需要车轴与复杂机械结构来实现特定方向的旋转,麦克纳姆轮却可以在任意方向自由旋转,无需任何附加装置,实现前行、横移、斜行、旋转。产生的合力保证了这个平台在最终的自由地移动,而不改变小车自身的方向。

更多驱动原理可跳转至:行空、掌控和麦轮十八法:https://mc.dfrobot.com.cn/thread-315270-1-1.html
3. OpenCV介绍
OpenCV(Open Source Computer Vision Library)是一个开源的计算机视觉库,由一系列 C 函数和少量 C++ 类构成,同时提供了Python、Ruby、MATLAB等语言的接口,实现了图像处理和计算机视觉方面的很多通用算法。其中包含了人脸识别的功能。可以通过训练模型进行视觉图像的识别,包括输出人脸和位置,就是本次项目中会用到的实现追踪效果的视觉算法。

4. 硬件选型
材料清单
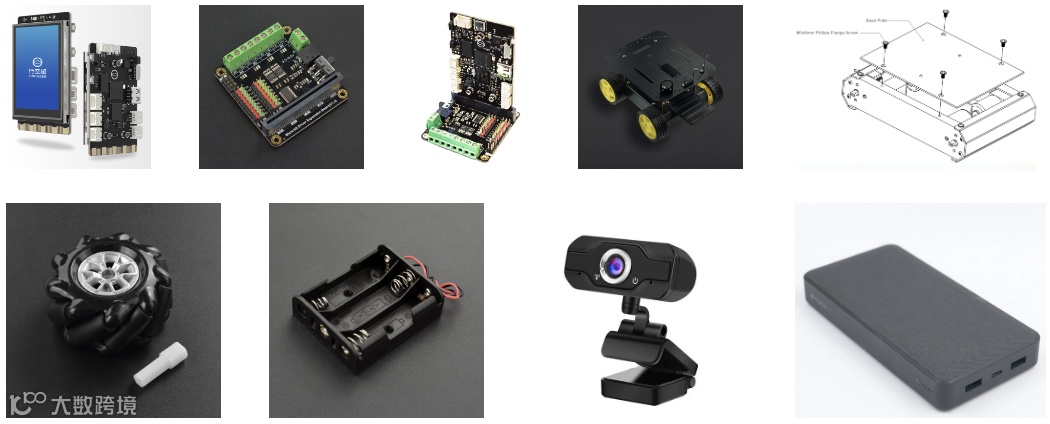
行空板 DFR0706X1
microbit电机驱动 DFR0548X1
海盗船四轮平台 ROB0003X1
60mm麦轮 FIT0765X4
三节5号电池盒 FIT0619X1
usb摄像头X1
移动电源
5. 硬件连接

将行空板的金手指插入microbit扩展板的扩展插槽内。

按图示将四个麦轮连接到microbit电机驱动板上,并安装三节AA电池供电。
麦轮安装的时候需要保持x型的组合方式。

运行程序前,确定已做以下三个步骤,否则程序上传会出现报错。
确定摄像头的usb插好。
确定行空板已单独供电。
确定将电机驱动版的电源开关打开。

二. 远程调试行空板
下面遇到了调试这个关键的问题,当小车需要实时在地上跑动进行调试时,拖着一根数据线总是不是很优雅。远程上传调试功能显得尤为重要。行空板的wifi功能可以满足这一点!
行空板可以连接Wi-Fi实现无线编程,首先需要将行空板连接到与电脑连接的同一个WiFi下,有两种配网方法。
1. 配置方法一:USB连接电脑有线配网
1.1 使用USB线连接行空板到电脑时,行空板会虚拟为一个RNDIS网卡设备,此时板子IP地址固定为‘10.1.2.3’。

1.2 将行空板连接局域网wifi:在浏览器中输入行空板ip:10.1.2.3。点击网络设置,输入需要连接的wifi(注意需要使用2.4G Wi-Fi)。然后电脑连接同一个热点,输入行空板的IP即可开始编程。

2. 配置方法二:使用行空板热点模式无线配网
2.1 首先开启行空板的无线热点

按home键进入主菜单,打开‘开关无线热点模式’,查看ssid(热点名称)和pass(热点密码)
使用可以连接wifi的电脑或手机连接到行空板的热点。
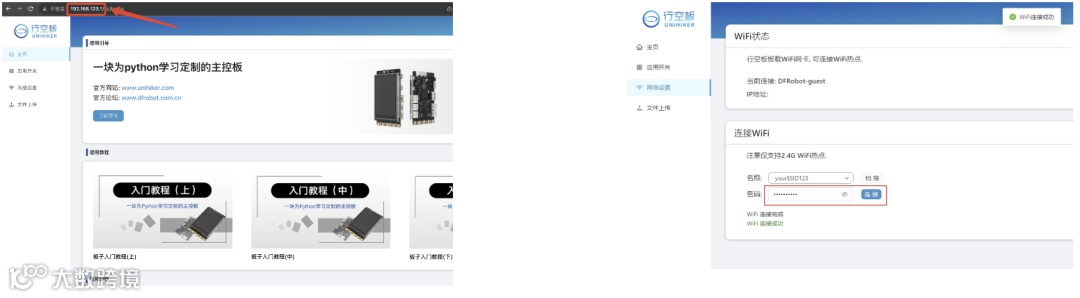
2.2 长按Home按键进入行空板板载菜单,其中查看网络信息页面可以看到行空板作为无线热点的时候IP地址固定是192.168.123.1

2.3 将行空板连接局域网wifi:在浏览器中输入行空板ip:192.168.123.1。点击网络设置,选择需要连接的wifi(注意需要使用2.4G Wi-Fi),输入密码连接成功。然后电脑连接同一个热点,输入板子的IP即可开始编程。
到现在配置行空板远程调试的功能就完成啦!
三. 编写Python代码
1. 编程平台:使用mind+或vscode编写代码。
mind+:进入‘Python模式’和‘代码’区域。新建文件并命名,点击“终端”按钮,然后“连接远程终端”,输入一步行空板配网得到的IP地址即可。
详细教程:行空板官方文档-Mind+使用教程:https://www.unihiker.com.cn/wiki/mindplus

vscode:安装Remote和python插件,输入上一步行空板配网得到的IP地址即可,通过SSH方式远程连接行空板编程。
详细教程:行空板官方文档-VScode连接:https://www.unihiker.com.cn/wiki/vscode

2. 代码逻辑与编写
使用OpenCV库识别人脸并计算出在所处画面的位置,当位置小于20或大于80时,驱动麦轮向左转或向右转达到追踪转向的效果。

如上图驱动原理所示,麦轮追踪人脸向左或向右转的驱动逻辑:
当摄像头左侧识别到人时,小车向右转动(面对人的视角)-- M1 & M2顺时针转动,M3 & M4逆时针转动。
当摄像头右侧识别到人时,小车向左转动(面对人的视角)-- M1 & M2逆时针转动,M3 & M4顺时针转动。
步骤1 导入opencv、pingpong库,初始化行空板和四个麦轮电机
代码:
import cv2
from pinpong.libs.microbit_motor import DFMotor
from pinpong.board import Board
import time
Board("unihiker").begin()
# Initialize motors
p_dfr0548_motor_one = DFMotor(1)
p_dfr0548_motor_two = DFMotor(2)
p_dfr0548_motor_three = DFMotor(3)
p_dfr0548_motor_four = DFMotor(4)
步骤2 设定转向功能
ccw表示逆时针方向(Counter Clockwise Direction)
cw表示顺时针方向(Clockwise Direction)
向左转:M1 & M2顺时针转动,M3 & M4逆时针转动。
代码:
def Left():
# Set motor speeds and directions to turn left
p_dfr0548_motor_one.speed(180)
p_dfr0548_motor_one.run(p_dfr0548_motor_one.CCW)
p_dfr0548_motor_two.speed(180)
p_dfr0548_motor_two.run(p_dfr0548_motor_two.CCW)
p_dfr0548_motor_three.speed(180)
p_dfr0548_motor_three.run(p_dfr0548_motor_three.CW)
p_dfr0548_motor_four.speed(180)
p_dfr0548_motor_four.run(p_dfr0548_motor_four.CW)
向右转:M1 & M2逆时针转动,M3 & M4顺时针转动。
代码:
def Right():
# Set motor speeds and directions to turn right
p_dfr0548_motor_one.speed(180)
p_dfr0548_motor_one.run(p_dfr0548_motor_one.CW)
p_dfr0548_motor_two.speed(180)
p_dfr0548_motor_two.run(p_dfr0548_motor_two.CW)
p_dfr0548_motor_three.speed(180)
p_dfr0548_motor_three.run(p_dfr0548_motor_three.CCW)
p_dfr0548_motor_four.speed(180)
p_dfr0548_motor_four.run(p_dfr0548_motor_four.CCW)
未检测到:M1 & M2 & M3 & M4停止。
代码:
def Stop():
# Stop all motors
p_dfr0548_motor_one.stop()
p_dfr0548_motor_two.stop()
p_dfr0548_motor_three.stop()
p_dfr0548_motor_four.stop()
步骤3 加载人脸识别的分类模型,并加载摄像机
casecade.load(cv2.data.haarcascades + "haarcascade_frontalface_default.xml"),加载opencv人脸识别模型
cap = cv2.VideoCapture(0) 打开默认的摄像头
代码:
casecade = cv2.CascadeClassifier()
casecade.load(cv2.data.haarcascades "haarcascade_frontalface_default.xml")
cap = cv2.VideoCapture(0)
while not (cap.isOpened()):
print("Camera not found")
time.sleep(1)
步骤4 设定摄像机参数
代码:
cap.set(cv2.CAP_PROP_FRAME_WIDTH, 320)
cap.set(cv2.CAP_PROP_FRAME_HEIGHT, 240)
cap.set(cv2.CAP_PROP_BUFFERSIZE, 1)
cv2.namedWindow('camera',cv2.WND_PROP_FULLSCREEN)
cv2.setWindowProperty('camera', cv2.WND_PROP_FULLSCREEN, cv2.WINDOW_FULLSCREEN)
步骤5 循环判断功能逻辑编写
打开摄像头获取视频流。---> 循环读取每一帧,进行人脸检测。---> 如果没有检测到人脸,停止小车。---> 如果检测到人脸,获取人脸位置,画出矩形框。---> 根据人脸在画面中的位置,如果横轴x<20小车需要向左转, 如果横轴x>80小车向右转,否则停止。---> 显示画面并判断是否退出循环。
cap.read(),读取当前帧图像到img。
cv2.flip,翻转图像,使其左右镜像。
img = cv2.resize(img, (240, 320)), 裁剪图像到240*320的比例。
cv2.rectangle(img, (x,y), (x+w,y+h), (255,0,0), 2, cv2.FILLED) , 在img图像上以(x,y)和(x+w,y+h)为对角顶点绘制一个蓝色线条宽度为2的矩形框,并填充这个矩形。
cv2.putText(img, str(x), (100, 30), cv2.FONT_HERSHEY_SIMPLEX, 0.8, (0, 255, 0) , 1) ,在img图像上的(100,30)坐标位置,使用SIMPLEX字体、0.8倍缩放比例、绿色、线宽为1绘制字符串内容str(x)。
代码:
步骤6 最后关闭摄像头,停止电机
代码:
Stop()
cap.release()
cv2.destroyAllWindows()
完整代码
代码:
3. 情绪表情显示模式
如果我把移动平台想象成一个情感上独立的实体与我互动,那么相机图像就可以用它自己的“面部表情”代替。当我检测到我的位置不同时,它会向左或向右转动,同时触发不同的表情。通过拟人化,它成为一个能够表达其内部状态的反应灵敏的伴侣,而不仅仅是一个带有摄像头的小车。这使得交互更加自然和有吸引力。

3.1 调整思路
要达到这个目的,需要将屏幕显示的内容从opencv的窗口显示换成unihiker的GUI表情显示,因此需要修改代码这几个地方:
(1)去除opencv窗口相关的部分代码
代码:
#窗口全屏的代码
#cv2.namedWindow('camera',cv2.WND_PROP_FULLSCREEN)
#cv2.setWindowProperty('camera', cv2.WND_PROP_FULLSCREEN, cv2.WINDOW_FULLSCREEN)
#在图片上显示人脸框以及实时位置坐标的代码
#cv2.rectangle(img, (x,y), (x+w,y+h), (255,0,0), 2, cv2.FILLED)
#cv2.putText(img, str(x), (100, 30), cv2.FONT_HERSHEY_SIMPLEX, 0.8, (0, 255, 0) , 1)
#将窗口显示到屏幕的代码
#cv2.imshow("camera", img)
(2)增加uinihiker库的GUI初始化代码
代码:
from unihiker import GUI
u_gui=GUI()
(3)增加屏幕表情显示的初始化代码,并在需要进行动作的地方加上表情切换显示的代码
表情初始化
切换表情
代码:
emj=u_gui.draw_emoji(emoji="Smile",x=0,y=0,duration=0.2)
emj.config(emoji="Peace")
emj.config(emoji="shock")
emj.config(emoji="Nerve")
(4)由于去掉了摄像头画面和人脸框的显示,因此还需要增加一个标志用来提示当前摄像头识别的位置,这里在屏幕最底下用一根可变位置的横线来表示

横线初始化
更新横线的位置
代码:
#显示到屏幕最底下,不影响画面显示
ln=u_gui.draw_line(x0=0, y0=318, x1=0, y1=318, width=2, color=(122,222,44))
#更新横线的起点和终点坐标为识别框的宽度
ln.config(x0=x,x1=x+w)
3.2 情绪显示模式完整代码
代码:
由行空板、麦克纳姆轮和OpenCV组成的应用,展现了远程无线控制和计算机视觉的强大潜力,我们可以做更多创意应用打造出各种智能、交互式的机器人和系统。在不久的将来,这种将控制、视觉和网络融为一体的系统可能会应用在更多领域中,改善我们的生活和工作。可以期待行空板和更多技术结合带来的无限可能!
往期推荐