


数据库拆分:数据库按照业务垂直拆分。
应用拆分:应用按照业务垂直拆分。
数据访问权限收口:数据权限按照各自业务领域,归属到各自的应用,应用与数据库一对一,禁止交叉访问。

数据库改造

代码改造方案
数据源选择:系统之前是支持多数据源切换的,在service上添加注解来选择数据源。数据库拆分后出现的情况是同一个service中操作的多个mapper从属于不同的库。
事务:事务注解目前是存在于service上的,并且事务会缓存数据库链接,一个事务内不支持同时操作多个数据库。
同时写入多个库,且是同一事务的接口6个:需改造数据源,需改造事务,需要关注分布式事务;
同时写入多个库,且不是同一事务的接口50+:需改造数据源,需改造事务,无需关注分布式事务;
同时读取多个库 或 读取一个库写入另一个库的接口200+:需改造数据源,但无需关注事务;
-
涉及多个库的表的联合查询8个:需进行代码逻辑改造
方案一

方案二

如图所示,方案二将数据源注解移动到Mapper上,并使用自定义的事务实现来处理事务。
问题1:如上图,事务的是配置在Service层,当事务开启时,数据源的连接并没有获取到,因为真正的数据源配置在Mapper上。所以会报错,这个错误可以通过多数据源组件的默认数据源功能解决。
-
问题2:mybatis的事务实现会缓存数据库链接。当第一次缓存了数据库链接后,后续配置在mapper上的数据源注解并不会重新获取数据库链接,而是直接使用缓存起来的数据库链接。如果后续的mapper要操作其余数据库,会出现找不到表的情况。鉴于以上问题,我们开发了一个自定义的事务实现类,用来解决这个问题。
下面将对方案中出现的两个组件进行简要说明原理。
多数据源组件
/*** 切面方法*/public Object switchDataSourceAroundAdvice(ProceedingJoinPoint pjp) throws Throwable {//获取数据源的名字String dsName = getDataSourceName(pjp);boolean dataSourceSwitched = false;if (StringUtils.isNotEmpty(dsName)&& !StringUtils.equals(dsName, StackRoutingDataSource.getCurrentTargetKey())) {// 见下一段代码StackRoutingDataSource.setTargetDs(dsName);dataSourceSwitched = true;}try {// 执行切面方法return pjp.proceed();} catch (Throwable e) {throw e;} finally {if (dataSourceSwitched) {StackRoutingDataSource.clear();}}}
public static void setTargetDs(String dbName) {if (dbName == null) {throw new NullPointerException();}if (contextHolder.get() == null) {contextHolder.set(new Stack<String>());}contextHolder.get().push(dbName);log.debug("set current datasource is " + dbName);}
StackRoutingDataSource继承AbstractRoutingDataSource类,AbstractRoutingDataSource是spring-jdbc包提供的一个了AbstractDataSource的抽象类,它实现了DataSource接口的用于获取数据库链接的方法。
自定义事务实现

如上图,Transaction和SpringManagedTransaction都是mybatis提供的类,他提供了接口供SqlSession使用,处理事务操作。
通过下边的一段代码可以看到,事务对象中存在connection变量,首次获得数据库链接后,后续当前事务内的所有数据库操作都不会重新获取数据库链接,而是会使用现有的数据库链接,从而无法支持跨库操作。
public class SpringManagedTransaction implements Transaction {private static final Log LOGGER = LogFactory.getLog(SpringManagedTransaction.class);private final DataSource dataSource;private Connection connection;private boolean isConnectionTransactional;private boolean autoCommit;public SpringManagedTransaction(DataSource dataSource) {notNull(dataSource, "No DataSource specified");this.dataSource = dataSource;}// 下略}
public class MultiDataSourceManagedTransaction extends SpringManagedTransaction {private DataSource dataSource;public ConcurrentHashMap<String, Connection> CON_MAP = new ConcurrentHashMap<>();public MultiDataSourceManagedTransaction(DataSource dataSource) {super(dataSource);this.dataSource = dataSource;}public Connection getConnection() throws SQLException {Method getCurrentTargetKey;String dataSourceKey;try {getCurrentTargetKey = dataSource.getClass().getDeclaredMethod("getCurrentTargetKey");getCurrentTargetKey.setAccessible(true);dataSourceKey = (String) getCurrentTargetKey.invoke(dataSource);} catch (Exception e) {log.error("MultiDataSourceManagedTransaction invoke getCurrentTargetKey 异常", e);return null;}if (CON_MAP.get(dataSourceKey) == null) {Connection connection = dataSource.getConnection();if (!TransactionSynchronizationManager.isActualTransactionActive()) {connection.setAutoCommit(true);} else {connection.setAutoCommit(false);}CON_MAP.put(dataSourceKey, connection);return connection;}return CON_MAP.get(dataSourceKey);}public void commit() throws SQLException {if (CON_MAP == null || CON_MAP.size() == 0) {return;}Set<Map.Entry<String, Connection>> entries = CON_MAP.entrySet();for (Map.Entry<String, Connection> entry : entries) {Connection value = entry.getValue();if (!value.isClosed() && !value.getAutoCommit()) {value.commit();}}}public void rollback() throws SQLException {if (CON_MAP == null || CON_MAP.size() == 0) {return;}Set<Map.Entry<String, Connection>> entries = CON_MAP.entrySet();for (Map.Entry<String, Connection> entry : entries) {Connection value = entry.getValue();if (value == null) {continue;}if (!value.isClosed() && !value.getAutoCommit()) {entry.getValue().rollback();}}}public void close() throws SQLException {if (CON_MAP == null || CON_MAP.size() == 0) {return;}Set<Map.Entry<String, Connection>> entries = CON_MAP.entrySet();for (Map.Entry<String, Connection> entry : entries) {DataSourceUtils.releaseConnection(entry.getValue(), this.dataSource);}CON_MAP.clear();}}
数据安全性
跨库事务:6处,采用了代码保证一致性的改造方式;上线前经过重点测试,保证逻辑无问题;
单库事务:依赖于自定义事务实现,针对自定义事务实现这一个类进行充分测试即可,测试范围小,安全性有保障;
-
其余单表操作:相关修改是在mapper上添加了数据源切换注解,改动位置几百处,几乎是无脑改动,但也存在遗漏或错改的可能;测试同学可以覆盖到核心业务流程,但边缘业务可能会遗漏;我们添加了线上监测机制,当出现找不到表的错误时(说明数据源切换注解添加错误),记录当前执行sql并报警,我们进行逻辑修复与数据处理。
综上,通过对三种情况的处理来保证数据的安全性。
系统性风险:一个组件缺陷会导致整个进程崩溃,如内存泄漏、死锁。
复杂性高:系统代码繁多,每次修改代码都心惊胆战,任何一个bug都可能导致整个系统崩溃,不敢优化代码导致代码可读性也越来越差。
-
测试环境冲突,测试效率低:业务都耦合在一个系统,只要有需求就会出现环境抢占,需要额外拉分支合并代码。
拆分方案
优点:一步到位。
-
缺点:需要主观挑选代码,然后挪到新系统,可视为做了全量业务逻辑的变动,需要全量测试,风险高,周期长。
优点:拆分速度快, 首次上线前无业务逻辑改动,风险低;后续删减代码时依据接口调用量情况来判定,也可视为无业务逻辑的改动,风险较低,并且各系统可各自进行,无需整体排期, 较为灵活。
-
缺点:分为了两步,拆分上线和删减代码


拆分实践
@Overridepublic void doFilter(ServletRequest request, ServletResponse response, FilterChain filterChain) throws ServletException, IOException {HttpServletRequest servletRequest = (HttpServletRequest) request;HttpServletResponse servletResponse = (HttpServletResponse) response;// 路由开关(0-不路由, 1-根据指定请求头路由, 2-全量路由)final int systemRouteSwitch = configUtils.getInteger("system_route_switch", 1);if (systemRouteSwitch == 0) {filterChain.doFilter(request, response);return;}// 只路由测试流量if (systemRouteSwitch == 1) {// 检查请求头是否包含测试流量标识 包含才进行路由String systemRoute = ((HttpServletRequest) request).getHeader("systemRoute");if (systemRoute == null || !systemRoute.equals("1")) {filterChain.doFilter(request, response);return;}}String systemRouteMapJsonStr = configUtils.getString("route.map", "");Map<String, String> map = JSONObject.parseObject(systemRouteMapJsonStr, Map.class);String rootUrl = map.get(servletRequest.getRequestURI());if (StringUtils.isEmpty(rootUrl)) {log.error("路由失败,本地服务内部处理。原因:请求地址映射不到对应系统, uri : {}", servletRequest.getRequestURI());filterChain.doFilter(request, response);return;}String targetURL = rootUrl + servletRequest.getRequestURI();if (servletRequest.getQueryString() != null) {targetURL = targetURL + "?" + servletRequest.getQueryString();}RequestEntity<byte[]> requestEntity = null;try {log.info("路由开始 targetURL = {}", targetURL);requestEntity = createRequestEntity(servletRequest, targetURL);ResponseEntity responseEntity = restTemplate.exchange(requestEntity, byte[].class);if (requestEntity != null && requestEntity.getBody() != null && requestEntity.getBody().length > 0) {log.info("路由完成-请求信息: requestEntity = {}, body = {}", requestEntity.toString(), new String(requestEntity.getBody()));} else {log.info("路由完成-请求信息: requestEntity = {}", requestEntity != null ? requestEntity.toString() : targetURL);}HttpHeaders headers = responseEntity.getHeaders();String resp = null;if (responseEntity.getBody() != null && headers != null && headers.get("Content-Encoding") != null && headers.get("Content-Encoding").contains("gzip")) {byte[] bytes = new byte[30 * 1024];int len = new GZIPInputStream(new ByteArrayInputStream((byte[]) responseEntity.getBody())).read(bytes, 0, bytes.length);resp = new String(bytes, 0, len);}log.info("路由完成-响应信息: targetURL = {}, headers = {}, resp = {}", targetURL, JSON.toJSONString(headers), resp);if (headers != null && headers.containsKey("Location") && CollectionUtils.isNotEmpty(headers.get("Location"))) {log.info("路由完成-需要重定向到 {}", headers.get("Location").get(0));((HttpServletResponse) response).sendRedirect(headers.get("Location").get(0));}addResponseHeaders(servletRequest, servletResponse, responseEntity);writeResponse(servletResponse, responseEntity);} catch (Exception e) {if (requestEntity != null && requestEntity.getBody() != null && requestEntity.getBody().length > 0) {log.error("路由异常-请求信息: requestEntity = {}, body = {}", requestEntity.toString(), new String(requestEntity.getBody()), e);} else {log.error("路由异常-请求信息: requestEntity = {}", requestEntity != null ? requestEntity.toString() : targetURL, e);}response.setCharacterEncoding("UTF-8");((HttpServletResponse) response).addHeader("Content-Type", "application/json");response.getWriter().write(JSON.toJSONString(ApiResponse.failed("9999", "网络繁忙哦~,请您稍后重试")));}}
路由filter是根据接口路径将请求分发到各个新系统的,所以需要抓取一份接口和新系统的映射关系。
我们这边自定义了一个注解@TargetSystem,用注解标识接口应该路由到的目标系统域名
public ApiResponse orderInfo(String orderId) {return ApiResponse.success();}
/*** 生成路由映射关系MAP* key:接口地址 ,value:路由到目标新系统的域名*/public Map<String, String> generateRouteMap() {Map<RequestMappingInfo, HandlerMethod> handlerMethods = requestMappingHandlerMapping.getHandlerMethods();Set<Map.Entry<RequestMappingInfo, HandlerMethod>> entries = handlerMethods.entrySet();Map<String, String> map = new HashMap<>();for (Map.Entry<RequestMappingInfo, HandlerMethod> entry : entries) {RequestMappingInfo key = entry.getKey();HandlerMethod value = entry.getValue();Class declaringClass = value.getMethod().getDeclaringClass();TargetSystem targetSystem = (TargetSystem) declaringClass.getAnnotation(TargetSystem.class);String targetUrl = targetSystem.value();String s1 = key.getPatternsCondition().toString();String url = s1.substring(1, s1.length() - 1);map.put(url, targetUrl);}return map;}


系统瘦身
拆分带来的好处
系统架构更合理,可用性更高:即使某个服务挂了也不会导致整个系统崩溃
复杂性可控:每个系统都是单一职责,系统逻辑清晰
系统性能提升上限大:可以针对每个系统做优化,如加缓存
-
测试环境冲突的问题解决,不会因为多个系统需求并行而抢占环境
问题介绍

改造过程
RPC接口统计(如图一)

RPC接口生成(如图二)
读取需要生成RPC接口的Dao文件,进行解析
获取文件名称,Dao方法列表,import导包列表等,放入ClassContext上下文
匹配api、rpc文件模板,从classContext内取值替换模板变量,通过package路径生成java文件到指定服务内
批量将服务内Dao名称后缀替换为Rpc服务名,减少人工改动风险,例:SettleRuleDao -> SettleRuleRpc

ftl:Freemarker模板的文件后缀名,FreeMarker是一个模版引擎,一个基于文本的模板输出工具。
interfaceName:用存放api文件名称
className:用于存放serviceImpl文件名称
methodList:用于存放方法列表,包含入参、出参、返回值等信息
importList:用于存放api和impl文件内其他引用实体的导包路径
apiPackage:用于存放生成的Api接口类包名
implPackage:用于存放生成的Api实现类包名
rpcPackage:用于存放生成的rpc调用类包名


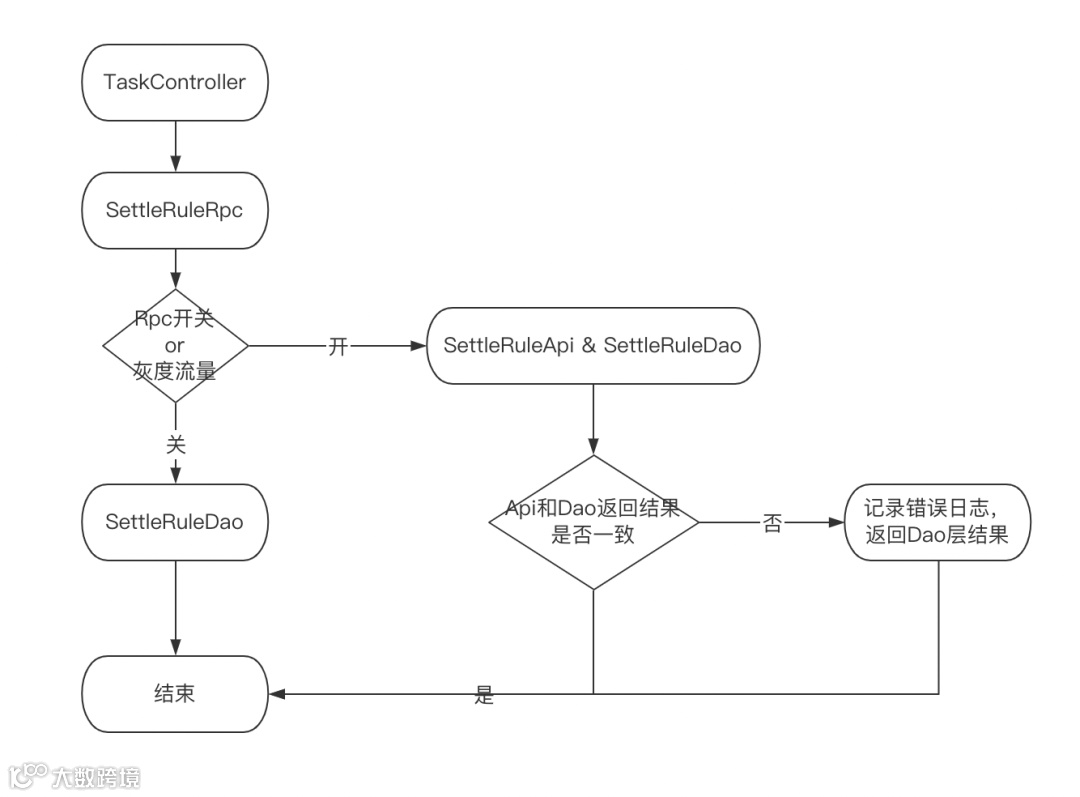
灰度方案(如图三)
数据操作统一走RPC层处理,初期阶段RPC层兼顾RPC调用,也有之前的DAO调用,使用开关切换。
RPC层进行双读,进行Api层和Dao层返回结果的比对,前期优先返回Dao层结果,验证无问题后,在全量返回RPC的结果,清除其他业务数据库连接。
支持开关一键切换,按流量进行灰度,降低数据收口风险
收益
业务数据解耦,数据操作统一由各自垂直系统进行,入口统一
-
方便后续在接口粒度上增加缓存和降级处理