
微信公众号:九极客
欢迎星标关注九极客,一起探讨技术与架构!
大家的点赞、收藏和评论很重要,如文章对您有帮助还请转发支持下,谢谢!

亿级流量下的系统架构演进与实战指南
在数字化时代,高并发已成为各类互联网应用的标配能力。根据2024年最新行业数据,头部电商平台的峰值QPS已突破100万次,而短视频平台的并发用户数更是达到亿级规模。面对如此巨大的流量冲击,如何设计稳定可靠的高并发系统,成为每个架构师必须掌握的硬核技能。

负载均衡:流量分发的艺术
负载均衡的核心原理与算法
负载均衡作为高并发系统的第一道防线,其作用是将海量请求合理分配到多个服务节点,避免单点过载。
负载均衡算法深度解析
不同的业务场景需要选择合适的负载均衡算法,以达到最优的资源利用和性能表现。
    /**
 * 负载均衡算法实现集
 */
public class LoadBalancerAlgorithms {

    /**
     * 轮询算法 - 均匀分配请求
     */
    public class RoundRobinLoadBalancer {
        private final List<Server> servers;
        private final AtomicInteger currentIndex = new AtomicInteger(0);

        public Server selectServer() {
            int index = currentIndex.getAndUpdate(i -> (i + 1) % servers.size());
            return servers.get(index);
        }
    }

    /**
     * 加权轮询算法 - 考虑服务器处理能力
     */
    public class WeightedRoundRobinLoadBalancer {
        private final List<WeightedServer> servers;
        private final AtomicInteger currentWeight = new AtomicInteger(0);
        private final int maxWeight;
        private final int gcdWeight;

        public Server selectServer() {
            while (true) {
                int current = currentWeight.getAndUpdate(i -> (i + 1) % maxWeight);
                for (WeightedServer server : servers) {
                    if (current % server.getWeight() == 0) {
                        return server;
                    }
                }
            }
        }
    }

    /**
     * 最少连接算法 - 动态感知服务器负载
     */
    public class LeastConnectionsLoadBalancer {
        private final Map<Server, AtomicInteger> connectionCounts;

        public Server selectServer() {
            return connectionCounts.entrySet().stream()
                .min(Map.Entry.comparingByValue(Comparator.comparing(AtomicInteger::get)))
                .map(Map.Entry::getKey)
                .orElseThrow(() -> new NoAvailableServerException());
        }

        public void releaseConnection(Server server) {
            connectionCounts.get(server).decrementAndGet();
        }
    }

    /**
     * 一致性哈希算法 - 减少缓存失效
     */
    public class ConsistentHashLoadBalancer {
        private final SortedMap<Integer, Server> circle = new TreeMap<>();
        private final int virtualNodes;

        public Server selectServer(String key) {
            if (circle.isEmpty()) {
                return null;
            }

            int hash = hashFunction(key);
            SortedMap<Integer, Server> tailMap = circle.tailMap(hash);
            int nodeHash = tailMap.isEmpty() ? circle.firstKey() : tailMap.firstKey();
            return circle.get(nodeHash);
        }

        private int hashFunction(String key) {
            // 使用MurmurHash等高质量的哈希函数
            return Hashing.murmur3_32().hashString(key, StandardCharsets.UTF_8).asInt();
        }
    }
}
四层与七层负载均衡的抉择
在实际架构设计中,我们需要根据业务特性选择合适的负载均衡层级。
四层负载均衡(L4)
    /**
 * 四层负载均衡配置示例
 * 基于IP和端口的流量分发
 */
public class Layer4LoadBalancing {

    @Configuration
    public class L4LoadBalancerConfig {

        @Bean
        public LoadBalancer tcpLoadBalancer() {
            return LoadBalancerBuilder
                .newBuilder()
                .build();
        }

        // Nginx四层负载均衡配置示例
        // stream {
        //     upstream backend_servers {
        //         server 192.168.1.10:8080;
        //         server 192.168.1.11:8080;
        //         server 192.168.1.12:8080;
        //     }
        //
        //     server {
        //         listen 80;
        //         proxy_pass backend_servers;
        //     }
        // }
    }
}
七层负载均衡(L7)
    /**
 * 七层负载均衡实现
 * 基于HTTP协议的内容感知路由
 */
public class Layer7LoadBalancing {

    @Configuration
    public class L7LoadBalancerConfig {

        @Bean
        public RouterFunction<ServerResponse> loadBalancerRouter() {
            return RouterFunctions.route()
                .GET("/api/users/{id}",
                    request -> {
                        String userId = request.pathVariable("id");
                        Server targetServer = userServiceLoadBalancer.selectServer(userId);
                        return ServerResponse.temporaryRedirect(
                            URI.create(targetServer.getUrl() + "/api/users/" + userId))
                            .build();
                    })
                .POST("/api/orders",
                    request -> {
                        Server targetServer = orderServiceLoadBalancer.selectServer();
                        return ServerResponse.temporaryRedirect(
                            URI.create(targetServer.getUrl() + "/api/orders"))
                            .build();
                    })
                .build();
        }

        // Nginx七层负载均衡配置示例
        // http {
        //     upstream backend {
        //         server 192.168.1.10:8080 weight=3;
        //         server 192.168.1.11:8080 weight=2;
        //         server 192.168.1.12:8080 weight=1;
        //
        //         # 健康检查
        //         check interval=3000 rise=2 fall=3 timeout=1000;
        //     }
        //
        //     server {
        //         listen 80;
        //
        //         location /api/ {
        //             proxy_pass http://backend;
        //             proxy_set_header Host $host;
        //             proxy_set_header X-Real-IP $remote_addr;
        //         }
        //     }
        // }
    }
}
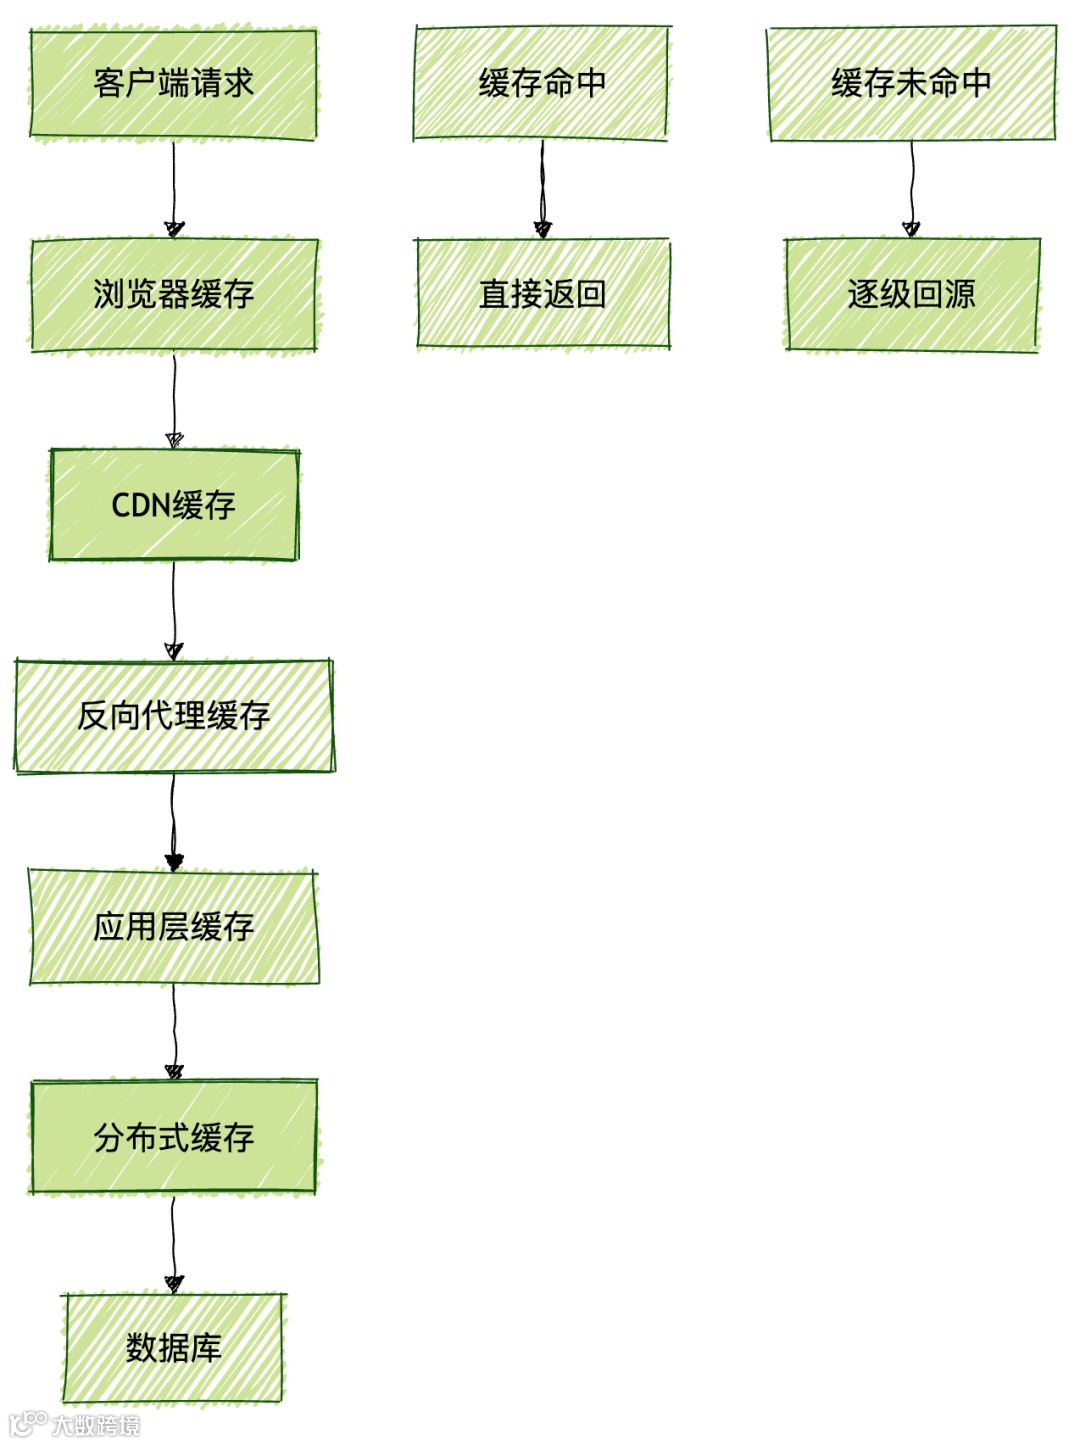
缓存架构:性能加速的关键
多级缓存体系设计
构建高效的多级缓存体系是提升系统性能的重要手段。
应用级缓存实现
    /**
 * 多级缓存实现框架
 */
public class MultiLevelCacheSystem {

    /**
     * 缓存层级管理器
     */
    @Service
    public class CacheManager {

        private final LocalCache localCache;
        private final DistributedCache distributedCache;
        private final CacheLoader cacheLoader;

        @Value("${cache.local.ttl:300}")
        private long localTtl;

        @Value("${cache.redis.ttl:3600}")
        private long redisTtl;

        /**
         * 多级缓存读取
         */
        public <T> T get(String key, Class<T> clazz) {
            // 第一级:本地缓存
            T value = localCache.get(key, clazz);
            if (value != null) {
                metrics.recordLocalCacheHit();
                return value;
            }

            // 第二级:分布式缓存
            value = distributedCache.get(key, clazz);
            if (value != null) {
                // 回填本地缓存
                localCache.set(key, value, localTtl);
                metrics.recordDistributedCacheHit();
                return value;
            }

            // 第三级:数据源加载
            value = cacheLoader.load(key, clazz);
            if (value != null) {
                // 异步回填缓存
                CompletableFuture.runAsync(() -> {
                    distributedCache.set(key, value, redisTtl);
                    localCache.set(key, value, localTtl);
                });
                metrics.recordCacheMiss();
            }

            return value;
        }
    }

    /**
     * 本地缓存实现 - Caffeine
     */
    @Configuration
    public class LocalCacheConfig {

        @Bean
        public Cache<String, Object> localCache() {
            return Caffeine.newBuilder()
                .maximumSize(10_000)
                .expireAfterWrite(5, TimeUnit.MINUTES)
                .recordStats()
                .build();
        }
    }

    /**
     * 分布式缓存实现 - Redis
     */
    @Configuration
    public class RedisCacheConfig {

        @Bean
        public RedisTemplate<String, Object> redisTemplate() {
            RedisTemplate<String, Object> template = new RedisTemplate<>();
            template.setConnectionFactory(redisConnectionFactory());
            template.setKeySerializer(new StringRedisSerializer());
            template.setValueSerializer(new GenericJackson2JsonRedisSerializer());
            return template;
        }

        @Bean
        public RedisCacheManager cacheManager() {
            RedisCacheConfiguration config = RedisCacheConfiguration.defaultCacheConfig()
                .entryTtl(Duration.ofHours(1))
                .disableCachingNullValues();

            return RedisCacheManager.builder(redisConnectionFactory())
                .cacheDefaults(config)
                .build();
        }
    }
}
缓存策略与一致性保障
缓存更新策略
    /**
 * 缓存更新策略实现
 */
public class CacheUpdateStrategies {

    /**
     * 写穿透策略
     */
    @Service
    @Transactional
    public class WriteThroughStrategy {

        public <T> void updateWithWriteThrough(String key, T value) {
            // 先更新数据库
            database.update(value);

            // 再更新缓存
            cache.set(key, value);
        }
    }

    /**
     * 写回策略
     */
    @Service
    public class WriteBackStrategy {

        private final WriteBuffer writeBuffer;

        @Async
        public <T> void updateWithWriteBack(String key, T value) {
            // 先更新缓存
            cache.set(key, value);

            // 异步批量更新数据库
            writeBuffer.add(new WriteTask(key, value));
        }
    }

    /**
     * 缓存删除策略
     */
    @Service
    public class CacheAsideStrategy {

        public <T> void updateWithCacheAside(String key, T value) {
            // 先更新数据库
            database.update(value);

            // 再删除缓存
            cache.delete(key);
        }

        public <T> T getWithCacheAside(String key, Class<T> clazz) {
            T value = cache.get(key, clazz);
            if (value == null) {
                value = database.load(key, clazz);
                if (value != null) {
                    cache.set(key, value);
                }
            }
            return value;
        }
    }
}
缓存一致性解决方案
    /**
 * 缓存一致性保障机制
 */
public class CacheConsistency {

    /**
     * 基于消息队列的最终一致性
     */
    @Service
    public class MessageQueueConsistency {

        private final RedisTemplate<String, Object> redisTemplate;
        private final KafkaTemplate<String, Object> kafkaTemplate;

        @EventListener
        public void handleDatabaseUpdate(DatabaseUpdateEvent event) {
            // 发布数据库变更事件
            kafkaTemplate.send("cache-invalidation",
                new CacheInvalidationMessage(event.getKey(), event.getOperation()));
        }

        @KafkaListener(topics = "cache-invalidation")
        public void processCacheInvalidation(CacheInvalidationMessage message) {
            // 处理缓存失效
            switch (message.getOperation()) {
                case UPDATE:
                case DELETE:
                    redisTemplate.delete(message.getKey());
                    break;
                case CREATE:
                    // 可以选择不处理,等待下次读取时加载
                    break;
            }
        }
    }

    /**
     * 分布式锁保障强一致性
     */
    @Service
    public class DistributedLockConsistency {

        private final RedissonClient redissonClient;

        public <T> T updateWithLock(String key, T newValue, Class<T> clazz) {
            RLock lock = redissonClient.getLock("cache_update_lock:" + key);

            try {
                lock.lock(10, TimeUnit.SECONDS);

                // 在锁内执行更新操作
                database.update(newValue);
                cache.delete(key);

                return newValue;
            } finally {
                lock.unlock();
            }
        }
    }
}
数据库分库分表:数据层面的水平扩展
分库分表的核心策略
当单表数据量达到千万级别时,分库分表成为必然选择。

分片策略选择
    /**
 * 分库分表策略实现
 */
public class ShardingStrategies {

    /**
     * 基于用户ID的取模分片
     */
    public class UserIdShardingStrategy implements ShardingStrategy {

        private final int databaseCount = 4;
        private final int tableCount = 8;

        @Override
        public String determineDataSource(String userId) {
            int dbIndex = Math.abs(userId.hashCode()) % databaseCount;
            return "user_db_" + dbIndex;
        }

        @Override
        public String determineTableName(String userId) {
            int tableIndex = Math.abs(userId.hashCode()) % tableCount;
            return "user_info_" + tableIndex;
        }
    }

    /**
     * 基于时间范围的分片
     */
    public class TimeBasedShardingStrategy implements ShardingStrategy {

        @Override
        public String determineDataSource(LocalDateTime createTime) {
            int year = createTime.getYear();
            // 每年一个数据库
            return "order_db_" + year;
        }

        @Override
        public String determineTableName(LocalDateTime createTime) {
            int month = createTime.getMonthValue();
            // 每月一个表
            return "order_info_" + month;
        }
    }

    /**
     * 一致性哈希分片
     */
    public class ConsistentHashShardingStrategy implements ShardingStrategy {

        private final ConsistentHash<DataSource> dataSourceHash;
        private final ConsistentHash<Table> tableHash;

        @Override
        public String determineDataSource(String shardingKey) {
            DataSource dataSource = dataSourceHash.get(shardingKey);
            return dataSource.getName();
        }
    }
}
ShardingSphere实战配置
分库分表配置示例
    # ShardingSphere数据分片配置
spring:
  shardingsphere:
    datasource:
      names: ds0, ds1, ds2, ds3
      ds0:
        type: com.zaxxer.hikari.HikariDataSource
        driver-class-name: com.mysql.cj.jdbc.Driver
        jdbc-url: jdbc:mysql://localhost:3306/user_db_0
        username: root
        password: password
      ds1:
        # ... 类似配置
      ds2:
        # ... 类似配置
      ds3:
        # ... 类似配置

    sharding:
      tables:
        user_info:
          actual-data-nodes: ds${0..3}.user_info_${0..7}
          database-strategy:
            standard:
              sharding-column: user_id
              precise-algorithm-class-name: com.example.UserIdDatabaseShardingAlgorithm
          table-strategy:
            standard:
              sharding-column: user_id
              precise-algorithm-class-name: com.example.UserIdTableShardingAlgorithm
          key-generator:
            column: id
            type: SNOWFLAKE

    props:
      sql:
        show: true
自定义分片算法实现
    /**
 * 自定义分片算法实现
 */
public class CustomShardingAlgorithms {

    /**
     * 用户ID数据库分片算法
     */
    public class UserIdDatabaseShardingAlgorithm implements PreciseShardingAlgorithm<String> {

        private final int databaseCount = 4;

        @Override
        public String doSharding(Collection<String> availableTargetNames,
                               PreciseShardingValue<String> shardingValue) {
            String userId = shardingValue.getValue();
            int databaseIndex = Math.abs(userId.hashCode()) % databaseCount;

            return availableTargetNames.stream()
                .filter(name -> name.endsWith(String.valueOf(databaseIndex)))
                .findFirst()
                .orElseThrow(() -> new IllegalArgumentException("未找到对应的数据库"));
        }
    }

    /**
     * 用户ID表分片算法
     */
    public class UserIdTableShardingAlgorithm implements PreciseShardingAlgorithm<String> {

        private final int tableCount = 8;

        @Override
        public String doSharding(Collection<String> availableTargetNames,
                               PreciseShardingValue<String> shardingValue) {
            String userId = shardingValue.getValue();
            int tableIndex = Math.abs(userId.hashCode()) % tableCount;

            String logicTableName = shardingValue.getLogicTableName();
            String actualTableName = logicTableName + "_" + tableIndex;

            return availableTargetNames.stream()
                .filter(name -> name.equals(actualTableName))
                .findFirst()
                .orElseThrow(() -> new IllegalArgumentException("未找到对应的数据表"));
        }
    }
}
读写分离与数据库优化
读写分离架构
通过读写分离将读操作和写操作分发到不同的数据库实例,提升系统整体吞吐量。
    /**
 * 读写分离配置与实现
 */
public class ReadWriteSeparation {

    /**
     * Spring Boot多数据源配置
     */
    @Configuration
    @EnableTransactionManagement
    public class DataSourceConfig {

        @Bean
        @ConfigurationProperties("spring.datasource.master")
        public DataSource masterDataSource() {
            return DataSourceBuilder.create().build();
        }

        @Bean
        @ConfigurationProperties("spring.datasource.slave")
        public DataSource slaveDataSource() {
            return DataSourceBuilder.create().build();
        }

        @Bean
        public DataSource routingDataSource() {
            Map<Object, Object> targetDataSources = new HashMap<>();
            targetDataSources.put("master", masterDataSource());
            targetDataSources.put("slave", slaveDataSource());

            ReadWriteSplitRoutingDataSource routingDataSource =
                new ReadWriteSplitRoutingDataSource();
            routingDataSource.setDefaultTargetDataSource(masterDataSource());
            routingDataSource.setTargetDataSources(targetDataSources);

            return routingDataSource;
        }
    }

    /**
     * 读写分离路由数据源
     */
    public class ReadWriteSplitRoutingDataSource extends AbstractRoutingDataSource {

        @Override
        protected Object determineCurrentLookupKey() {
            return TransactionSynchronizationManager.isCurrentTransactionReadOnly() ?
                   "slave" : "master";
        }
    }

    /**
     * 基于注解的读写分离
     */
    @Target(ElementType.METHOD)
    @Retention(RetentionPolicy.RUNTIME)
    public @interface ReadOnly {
    }

    @Aspect
    @Component
    public class ReadWriteSeparationAspect {

        @Around("@annotation(readOnly)")
        public Object proceed(ProceedingJoinPoint joinPoint, ReadOnly readOnly) throws Throwable {
            try {
                TransactionSynchronizationManager.setCurrentTransactionReadOnly(true);
                return joinPoint.proceed();
            } finally {
                TransactionSynchronizationManager.setCurrentTransactionReadOnly(false);
            }
        }
    }
}
数据库连接池优化
    /**
 * 数据库连接池优化配置
 */
public class ConnectionPoolOptimization {

    @Configuration
    public class HikariCPConfig {

        @Bean
        @ConfigurationProperties("spring.datasource.hikari")
        public DataSource dataSource() {
            HikariConfig config = new HikariConfig();

            // 连接池大小配置
            config.setMaximumPoolSize(20);
            config.setMinimumIdle(10);
            config.setConnectionTimeout(30000);
            config.setIdleTimeout(600000);
            config.setMaxLifetime(1800000);

            // 优化配置
            config.setConnectionTestQuery("SELECT 1");
            config.setValidationTimeout(5000);
            config.setLeakDetectionThreshold(60000);

            // 针对高并发的优化
            config.addDataSourceProperty("cachePrepStmts", "true");
            config.addDataSourceProperty("prepStmtCacheSize", "250");
            config.addDataSourceProperty("prepStmtCacheSqlLimit", "2048");
            config.addDataSourceProperty("useServerPrepStmts", "true");
            config.addDataSourceProperty("useLocalSessionState", "true");
            config.addDataSourceProperty("rewriteBatchedStatements", "true");
            config.addDataSourceProperty("cacheResultSetMetadata", "true");
            config.addDataSourceProperty("cacheServerConfiguration", "true");
            config.addDataSourceProperty("elideSetAutoCommits", "true");
            config.addDataSourceProperty("maintainTimeStats", "false");

            return new HikariDataSource(config);
        }
    }
}
消息队列:异步解耦与流量削峰
消息队列在高并发系统中的应用
    /**
 * 基于消息队列的异步处理架构
 */
public class MessageQueueArchitecture {

    /**
     * 订单创建异步处理示例
     */
    @Service
    public class OrderService {

        private final KafkaTemplate<String, Object> kafkaTemplate;
        private final OrderRepository orderRepository;

        @Transactional
        public void createOrder(Order order) {
            // 同步操作:保存订单核心数据
            orderRepository.save(order);

            // 异步操作:发送消息到MQ
            kafkaTemplate.send("order-created",
                new OrderCreatedEvent(order.getId(), order.getUserId(), order.getAmount()));
        }
    }

    /**
     * 库存处理消费者
     */
    @Service
    public class InventoryConsumer {

        @KafkaListener(topics = "order-created")
        public void processOrderCreated(OrderCreatedEvent event) {
            // 异步扣减库存
            inventoryService.deductStock(event.getOrderId(), event.getItems());
        }
    }

    /**
     * 积分处理消费者
     */
    @Service
    public class PointsConsumer {

        @KafkaListener(topics = "order-created")
        public void processOrderCreated(OrderCreatedEvent event) {
            // 异步增加积分
            pointsService.addPoints(event.getUserId(), event.getAmount());
        }
    }

    /**
     * 消息队列配置
     */
    @Configuration
    @EnableKafka
    public class KafkaConfig {

        @Bean
        public ProducerFactory<String, Object> producerFactory() {
            Map<String, Object> props = new HashMap<>();
            props.put(ProducerConfig.BOOTSTRAP_SERVERS_CONFIG, "localhost:9092");
            props.put(ProducerConfig.KEY_SERIALIZER_CLASS_CONFIG, StringSerializer.class);
            props.put(ProducerConfig.VALUE_SERIALIZER_CLASS_CONFIG, JsonSerializer.class);

            // 高并发优化配置
            props.put(ProducerConfig.BATCH_SIZE_CONFIG, 16384);
            props.put(ProducerConfig.LINGER_MS_CONFIG, 10);
            props.put(ProducerConfig.BUFFER_MEMORY_CONFIG, 33554432);
            props.put(ProducerConfig.ACKS_CONFIG, "1");
            props.put(ProducerConfig.MAX_IN_FLIGHT_REQUESTS_PER_CONNECTION, 5);
            props.put(ProducerConfig.RETRIES_CONFIG, 3);

            return new DefaultKafkaProducerFactory<>(props);
        }

        @Bean
        public ConsumerFactory<String, Object> consumerFactory() {
            Map<String, Object> props = new HashMap<>();
            props.put(ConsumerConfig.BOOTSTRAP_SERVERS_CONFIG, "localhost:9092");
            props.put(ConsumerConfig.KEY_DESERIALIZER_CLASS_CONFIG, StringDeserializer.class);
            props.put(ConsumerConfig.VALUE_DESERIALIZER_CLASS_CONFIG, JsonDeserializer.class);
            props.put(ConsumerConfig.GROUP_ID_CONFIG, "order-service");

            // 高并发优化配置
            props.put(ConsumerConfig.FETCH_MIN_BYTES_CONFIG, 1024);
            props.put(ConsumerConfig.FETCH_MAX_WAIT_MS_CONFIG, 500);
            props.put(ConsumerConfig.MAX_POLL_RECORDS_CONFIG, 500);

            return new DefaultKafkaConsumerFactory<>(props);
        }
    }
}
监控与弹性伸缩
系统监控体系
    /**
 * 高并发系统监控实现
 */
public class SystemMonitoring {

    /**
     * 指标收集与监控
     */
    @Component
    public class SystemMetrics {

        private final MeterRegistry meterRegistry;

        // QPS监控
        private final Counter requestCounter;

        // 响应时间监控
        private final Timer responseTimer;

        // 错误率监控
        private final Counter errorCounter;

        public SystemMetrics(MeterRegistry meterRegistry) {
            this.meterRegistry = meterRegistry;
            this.requestCounter = Counter.builder("http.requests.total")
                .description("Total HTTP requests")
                .register(meterRegistry);

            this.responseTimer = Timer.builder("http.request.duration")
                .description("HTTP request duration")
                .register(meterRegistry);

            this.errorCounter = Counter.builder("http.errors.total")
                .description("Total HTTP errors")
                .register(meterRegistry);
        }

        public void recordRequest(String path, String method, long duration, boolean success) {
            requestCounter.increment();
            responseTimer.record(duration, TimeUnit.MILLISECONDS);

            if (!success) {
                errorCounter.increment();
            }

            // 记录标签信息
            meterRegistry.counter("http.requests",
                "path", path,
                "method", method,
                "status", success ? "success" : "error"
            ).increment();
        }
    }

    /**
     * 弹性伸缩触发器
     */
    @Component
    public class AutoScalingTrigger {

        private final KubernetesClient kubernetesClient;
        private final MeterRegistry meterRegistry;

        @Scheduled(fixedRate = 30000) // 每30秒检查一次
        public void checkScaling() {
            double cpuUsage = getAverageCpuUsage();
            double qps = getCurrentQPS();
            double errorRate = getErrorRate();

            if (shouldScaleUp(cpuUsage, qps, errorRate)) {
                scaleUp();
            } else if (shouldScaleDown(cpuUsage, qps, errorRate)) {
                scaleDown();
            }
        }

        private boolean shouldScaleUp(double cpuUsage, double qps, double errorRate) {
            return cpuUsage > 0.7 || qps > 1000 || errorRate > 0.05;
        }

        private boolean shouldScaleDown(double cpuUsage, double qps, double errorRate) {
            return cpuUsage < 0.3 && qps < 100 && errorRate < 0.01;
        }

        private void scaleUp() {
            kubernetesClient.apps().deployments()
                .inNamespace("default")
                .withName("user-service")
                .scale(Math.min(currentReplicas + 2, maxReplicas));
        }

        private void scaleDown() {
            kubernetesClient.apps().deployments()
                .inNamespace("default")
                .withName("user-service")
                .scale(Math.max(currentReplicas - 1, minReplicas));
        }
    }
}
总结
高并发系统设计是一个系统工程,需要从负载均衡、缓存架构、数据库分片、消息队列到监控弹性等多个层面进行综合考虑。负载均衡确保流量合理分配,多级缓存提升读取性能,分库分表解决数据存储瓶颈,消息队列实现异步解耦和流量削峰,完善的监控体系保障系统稳定运行。在实际项目中,需要根据业务特性和流量模式选择合适的架构方案,并通过持续的监控和优化来应对不断变化的并发挑战。