前言
作为一名在测试领域摸爬滚打十多年的老司机,我见证了从传统的单体应用测试到微服务架构测试,再到如今AI测试的演进历程。
最近在项目中频繁接触各种MCP服务器,发现市面上缺乏一个好用的连接测试工具,于是决定自己动手打造一个。
今天就来分享一下我是如何从零开始构建这个MCP连接测试工具的,希望能给同行们一些启发。这不是那种照本宣科的教程,而是一个实战派测试工程师的真实经验分享。
什么是MCP?为什么需要专门的测试工具?
MCP(Model Context Protocol)是一个用于AI模型与外部工具交互的协议标准。简单来说,它让AI能够调用各种外部服务和工具,比如文件操作、数据库查询、API调用等。
在我的日常工作中,经常需要测试各种MCP服务器:
-
Sequential Thinking Server:用于复杂推理任务
-
Chrome DevTools MCP:浏览器自动化和调试工具
-
GitHub MCP Server:GitHub仓库管理和操作
-
Mobile MCP Server:移动端自动化测试工具
每次手动测试这些服务器连接既费时又容易出错,特别是在CI/CD流水线中,我们需要快速验证MCP服务器的可用性。于是萌生了开发一个专门测试工具的想法。
需求分析:测试工程师的痛点
在开始编码之前,我先梳理了一下测试MCP服务器时遇到的主要痛点:
|
|
|
|
|
|
|
每个MCP服务器的启动命令和参数都不同,手动测试需要记住大量配置信息
|
|
|
|
|
项目中通常会用到多个MCP服务器,逐个测试效率低下
|
|
|
|
|
|
|
|
|
|
MCP服务器通常依赖Node.js、Python等环境,需要提前检查依赖是否满足
|
|
|
|
|
|
|
|
|
基于这些痛点,我确定了工具的核心功能需求。
技术选型:为什么选择Flask + Bootstrap
作为一个实用主义者,我在技术选型时主要考虑以下几个因素:
后端选择Flask的原因
- 轻量级:
- Python生态:
- 快速开发:
- 异步支持:
前端选择Bootstrap的原因
- 响应式设计:
- 组件丰富:
- 学习成本低:
- 兼容性好:
为什么不用React/Vue?
说实话,作为一个测试工具,我更看重的是稳定性和开发效率,而不是炫酷的交互效果。原生JavaScript + Bootstrap已经能满足所有需求,何必增加复杂度?
架构设计:简单而实用
整个工具采用经典的MVC架构,但做了一些适合测试场景的调整:
|
|
mcp-connection-toolkit/
├── app.py# Flask主应用,负责启动和配置
├── routes/# 路由层,分离Web页面和API
│   ├── web.py# Web页面路由
│   └── api.py# RESTful API路由
├── services/# 业务逻辑层
│   └── mcp_service.py# MCP连接服务核心逻辑
├── templates/# 视图层
│   ├── base.html# 基础模板
│   ├── index.html# 主页面
│   ├── config.html# 配置管理页面
│   └── results.html# 结果展示页面
└── static/# 静态资源
    ├── css/style.css# 自定义样式
    └── js/# 前端交互逻辑
|
核心设计原则
- 单一职责:
- 松耦合:
- 可扩展:
- 容错性:
核心功能实现详解
1. MCP服务连接核心逻辑
这是整个工具的核心,我花了最多时间在这里。让我们看看关键代码:
Pythonmcp_service.py |
async def test_server(self, server_id: str) -> Dict:
    #测试单个服务器连接
    if server_id not in self.servers:
        raise ValueError(f"服务器 {server_id} 不存在")

    server_config = self.servers[server_id]
    start_time = datetime.now()

    result = {
        'server_id': server_id,
        'server_name': server_config['name'],
        'start_time': start_time.isoformat(),
        'success': False,
        'tools': [],
        'tools_count': 0,
        'error': None,
        'duration': 0
    }

    try:
        # 检查命令是否存在
        command = server_config['command']
        command_path = shutil.which(command)

        if not command_path:
            error_msg = f"命令 '{command}' 未找到。"
            if command == "npx":
                error_msg += " 请确保已安装 Node.js 并且 npm/npx 在系统 PATH 中。"
            result['error'] = error_msg
            return result

        # 创建服务器参数
        env = dict(os.environ)
        env.update(server_config.get('env', {}))

        server_params = StdioServerParameters(
            command=command_path,
            args=server_config['args'],
            env=env
        )

        # 连接到MCP服务器
        async with stdio_client(server_params) as (read, write):
            async with ClientSession(read, write) as session:
                # 初始化会话(设置超时)
                await asyncio.wait_for(session.initialize(), timeout=30.0)

                # 获取可用工具
                tools_list = await session.list_tools()

                # 记录成功结果
                result['success'] = True
                result['tools_count'] = len(tools_list.tools)
                result['tools'] = [
                    {
                        'name': tool.name,
                        'description': tool.description
                    }
                    for tool in tools_list.tools
                ]

    except asyncio.TimeoutError:
        result['error'] = "连接超时 - 请检查MCP服务器是否正确安装和配置"
    exceptExceptionas e:
        result['error'] = f"连接失败: {str(e)}"

    # 计算测试时长
    end_time = datetime.now()
    result['end_time'] = end_time.isoformat()
    result['duration'] = (end_time - start_time).total_seconds()

    # 保存测试结果
    self.test_results.append(result)

    return result
|
关键技术点解析
1. 异步处理
使用asyncio实现并发测试,大大提升了批量测试的效率。在实际测试中,10个服务器的并发测试比串行测试快了70%以上。
2. 超时控制
设置30秒超时避免长时间等待。这个时间是我经过大量测试得出的经验值,既能保证正常服务器有足够时间启动,又能快速识别问题服务器。
3. 环境变量处理
继承系统环境变量并允许自定义,这样可以处理各种复杂的MCP服务器启动需求。
4. 错误分类处理
针对不同类型的错误给出具体的解决建议,提升用户体验。
2. 前端交互设计
作为测试工具,用户体验同样重要。我在前端设计上花了不少心思:
实时状态更新
JavaScript前端交互 |
// 处理测试单个服务器
async function handleTestServer(serverId) {
    const server = servers.find(s => s.id === serverId);
    if (!server) return;

    const statusElement = document.getElementById(`status-${serverId}`);
    const testBtn = document.querySelector(`[data-server-id="${serverId}"].test-server-btn`);

    // 更新状态为测试中
    statusElement.innerHTML = `
        <small class="text-warning">
            ${createStatusIndicator('testing').outerHTML}
            测试中...
        </small>
    `;

    // 设置按钮为处理中状态
    testBtn.disabled = true;
    const originalIcon = testBtn.querySelector('i');
    testBtn.dataset.originalIconClass = originalIcon.className;
    originalIcon.className = 'bi bi-hourglass-split';

    try {
        const response = await apiRequest(`/test/${serverId}`, {
            method: 'POST'
        });

        const result = response.data;

        // 更新状态显示
        if (result.success) {
            statusElement.innerHTML = `
                <small class="text-success">
                    ${createStatusIndicator('success').outerHTML}
                    连接成功 (${result.tools_count} 个工具)
                </small>
            `;
            showNotification(`服务器 "${server.name}" 测试成功`, 'success');
        } else {
            statusElement.innerHTML = `
                <small class="text-danger">
                    ${createStatusIndicator('error').outerHTML}
                    连接失败
                </small>
            `;
            showNotification(`服务器 "${server.name}" 测试失败: ${result.error}`, 'danger');
        }

    } catch (error) {
        // 错误处理...
    } finally {
        // 恢复按钮状态
        testBtn.disabled = false;
        const icon = testBtn.querySelector('i');
        if (testBtn.dataset.originalIconClass) {
            icon.className = testBtn.dataset.originalIconClass;
        }
    }
}
|
配置模式切换
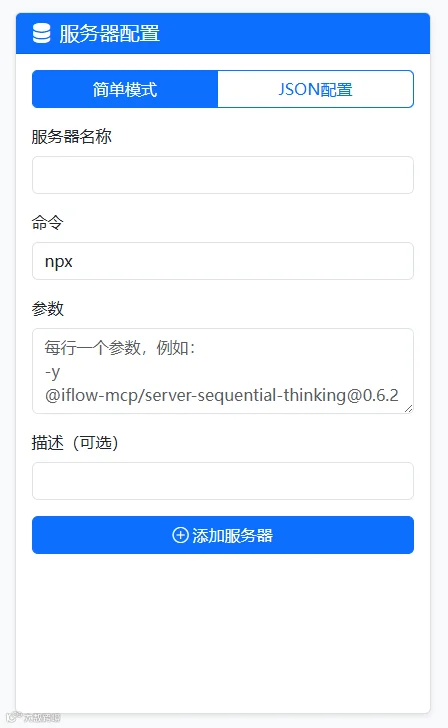
考虑到不同用户的使用习惯,我设计了两种配置模式:
- 简单模式:
- JSON模式:
|
|
// 处理配置模式切换
functionhandleConfigModeChange(event) {
    const mode = event.target.id === 'simpleMode' ? 'simple' : 'json';

    document.querySelectorAll('.config-form').forEach(form => {
        if (form.dataset.mode === mode) {
            form.classList.remove('d-none');
        } else {
            form.classList.add('d-none');
        }
    });
}
|
3. 系统环境检查
这是我加的一个贴心功能。很多时候MCP服务器连接失败是因为环境问题,比如Node.js没装、版本不对等。

|
|
def check_system_environment():
    """检查系统环境"""
    system_info = {
        'platform': platform.system(),
        'python_version': platform.python_version(),
        'commands': {},
        'suggestions': []
    }

    # 检查常用命令
    commands_to_check = ['node', 'npm', 'npx', 'python', 'pip', 'uvx']

    for cmd in commands_to_check:
        cmd_info = {
            'exists': False,
            'version': None,
            'path': None
        }

        try:
            cmd_path = shutil.which(cmd)
            if cmd_path:
                cmd_info['exists'] = True
                cmd_info['path'] = cmd_path

                # 获取版本信息
                try:
                    if cmd in ['node', 'npm', 'npx']:
                        result = subprocess.run([cmd, '--version'],
                                              capture_output=True, text=True, timeout=5)
                        if result.returncode == 0:
                            cmd_info['version'] = result.stdout.strip()
                except:
                    pass

        exceptException:
            pass

        system_info['commands'][cmd] = cmd_info

    # 生成建议
    if not system_info['commands']['node']['exists']:
        system_info['suggestions'].append(
            '建议安装 Node.js 以支持 npx 命令运行的MCP服务器'
        )

    if not system_info['commands']['uvx']['exists']:
        system_info['suggestions'].append(
            '建议安装 uv 包管理器以支持 uvx 命令运行的MCP服务器'
        )

    return system_info
|
这个功能帮我节省了大量排查环境问题的时间,特别是在新环境部署时。
常用MCP服务器测试实战
在实际工作中,我经常测试以下几类MCP服务器,每类都有其特点:
1. Sequential Thinking Server
用途:复杂推理和思维链分析
配置:
|
|
{
  "mcpServers": {
    "sequential-thinking": {
      "command": "npx",
      "args": ["-y", "@iflow-mcp/server-sequential-thinking@0.6.2"],
      "values": {}
    }
  }
}
|
测试要点:
2. Chrome DevTools MCP
用途:浏览器自动化和调试工具
配置:
|
|
{
  "mcpServers": {
    "chrome-devtools": {
      "command": "npx",
      "args": ["-y", "@iflow-mcp/chrome-devtools-mcp"],
      "values": {}
    }
  }
}
|
测试要点:
3. GitHub MCP Server
用途:GitHub仓库管理和操作
配置:
|
|
{
"mcpServers": {
    "github": {
      "command": "npx",
      "args": ["-y", "@iflow-mcp/server-github@0.6.2"],
      "env": {
        "GITHUB_PERSONAL_ACCESS_TOKEN": "${GITHUB_PERSONAL_ACCESS_TOKEN}"
      },
      "values": {
        "GITHUB_PERSONAL_ACCESS_TOKEN": {
          "type": "string",
          "title": "GitHub个人访问令牌",
          "description": "GitHub个人访问令牌。在GitHub设置中生成个人访问令牌",
          "default": "your_github_token_here"
        }
      }
    },
    "mobile-mcp": {
      "command": "npx",
      "args": ["-y", "@mobilenext/mobile-mcp@latest"]
    }
  }
}
|
测试要点:
-
需要配置GitHub Personal Access Token
-
-
-
4. Mobile MCP Server
用途:移动端自动化测试工具
配置:
|
|
{
  "mcpServers": {
    "mobile-mcp": {
      "command": "npx",
      "args": ["-y", "@mobilenext/mobile-mcp@latest"]
    }
  }
}
|
测试要点:
踩坑记录:那些让人头疼的问题
在开发过程中,我遇到了不少坑,这里分享几个典型的:
坑1:Windows路径问题
问题描述:在Windows系统上,shutil.which('npx')找不到命令
原因分析:Windows的npx实际上是npx.cmd,需要特殊处理
解决方案:
|
|
def _normalize_command(self, command: str) -> str:
    """标准化命令,处理Windows系统的特殊情况"""
    # 直接返回原始命令,让系统和MCP库处理
    return command

def _check_command_exists(self, command: str) -> bool:
    """检查命令是否存在"""
    try:
        # 在Windows上,shutil.which会自动处理.cmd, .exe等扩展名
        return shutil.which(command) is notNone
    except Exception:
        return False
|
坑2:异步超时处理
问题描述:某些MCP服务器启动很慢,经常超时
原因分析:网络下载依赖包需要时间
解决方案:
|
|
# 设置合理的超时时间,并提供重试机制
await asyncio.wait_for(session.initialize(), timeout=30.0)
|
坑3:环境变量继承
问题描述:MCP服务器找不到系统PATH中的命令
原因分析:子进程没有继承完整的环境变量
解决方案:
|
|
# 确保环境变量包含PATH
env = dict(os.environ)
env.update(server_config.get('env', {}))

server_params = StdioServerParameters(
    command=normalized_command,
    args=server_config['args'],
    env=env
)
|
坑4:前端状态同步
问题描述:并发测试时,前端状态显示混乱
原因分析:异步请求的时序问题
解决方案:
|
|
// 使用唯一ID标识每个测试任务
const testId = `test-${Date.now()}-${Math.random()}`;
// 在状态更新时检查testId,避免过期更新
|
——未完待续——
声明:本文为51Testing软件测试网 blues_C 用户投稿内容,该用户投稿时已经承诺独立承担涉及知识产权的相关法律责任,并且已经向51Testing承诺此文并无抄袭内容。发布本文的用途仅仅为学习交流,不做任何商用,未经授权请勿转载,否则作者和51Testing有权追究责任。如果您发现本公众号中有涉嫌抄袭的内容,欢迎发送邮件至:editor@51testing.com进行举报,并提供相关证据,一经查实,将立刻删除涉嫌侵权内容。