


Claude Code 团队成员 Addy Osmani 在 claude.dev 发布了这篇 Mods 入门教程。从显示上下文用量,到预览危险命令、回放文件修改,他用三个例子讲清了如何改造 Claude Code 会话。以下是全文翻译。

Mod 是一个在 Claude Code 会话里运行的小型 JavaScript 或 TypeScript 文件。它能观察会话中发生的事,改变 Claude Code 的行为,也能在终端或桌面应用中绘制自己的界面。想试用一个 Mod,不必先学 API:运行 claude,描述你想要的功能,在它询问时允许热重载,等这一轮结束,Mod 就会出现。
Claude Code 已经提供了很多改变行为的方式:设置、权限规则、斜杠命令、Skills 和状态栏。Mods 更进一步:它们能改写或替换 Claude Code 的行为,还能绘制自定义界面。从底层看,Mods 是随插件一起分发的钩子,每个 Mod 都能看到会话中实时发生的所有事件。
这样,你就能让 Claude Code 更贴合自己的工作方式。加一块经常要看的信息显示区,为让你不放心的命令设置一道关卡,或者做一个符合自己阅读习惯的修改审阅界面。
本指南从一个空文件夹开始,做出 Token Weather:在输入框上方实时显示上下文窗口的“天气预报”。它大约有 80 行代码。随后,我们再看看两个更大的 Mod——Blast Radius 和 Replay Theater,了解这套 API 还能做些什么。
视频预览:图 A:在同一个终端会话中,依次演示 Token Weather、Blast Radius 和 Replay Theater

视频预览:图 B:上下文窗口逐渐填满时的 Token Weather 状态条——18% 是晴天,67% 是阵雨,81% 是暴风雨
需要 Claude Code 2.1.287 或更新版本。Mods 默认开启,不需要另外打开开关。不同版本之间,API 可能发生变化。每次加载 Mod 时,Claude Code 都会把当前版本的类型声明写进该 Mod 的 .claude-plugin/types/ 文件夹;对你使用的版本来说,这些声明才是准绳。
Mod 是怎样工作的
Mod 是一种 Claude Code 插件,它的行为写在一个 JavaScript 或 TypeScript 模块里:
-
文件夹是一个普通插件,带有 .claude-plugin/plugin.json清单。 hooks/hooks.json在 modules下指定一个模块。-
模块导出 register(on, options)。在这个函数里,通过on(event, matcher?, hook)添加钩子。
所有钩子的形式都一样:
on("tool.call", { tool: "Bash" }, async ($, e, next) => {
  // $    the mods API: ui, session, state, store, fs, process, clock, http, tool, command, model, ...
  // e    this event's input, as plain data
  // next passes e to the other plugins and then to Claude Code's own behavior
  return next(e);
});钩子像中间件一样组成一条链。你的钩子先运行,next(e) 把事件交给下一个插件;到了链条最底端,Claude Code 执行原本要做的事。一个钩子可以做三种操作:

Mod 钩子链:事件向下传递,结果向上返回;钩子也可以直接回答
|
|
|
|
|---|---|---|
|
|
const r = await next(e); /* look */ return r |
|
|
|
return next({ ...e, command: safer }) |
|
|
|
next,直接 return { deny: "…" }
|
|
事件涵盖工具调用、提交后的提示词、每轮的开始与结束、会话的开始与结束、斜杠命令,以及 ui.render——界面中每个部分的绘制事件。模块在自己的沙箱里运行,既没有 DOM,也没有 Node,因此,所有对外操作都要通过 $。
它和设置里的 hooks 有什么不同? 设置中的钩子每遇到一个事件,就运行一次 shell 命令,通过标准输入和标准输出传递 JSON。Mod 只加载一次,随后一直留在会话里。它能保存状态、绘制随事件更新的界面,还能调用 Claude Code 的功能:打开面板、运行进程、注册斜杠命令,或注册一个供模型调用的工具。
Claude Code 自己也在用。 Claude Code 的部分内置功能就是用 Mods 实现的,包括 AGENTS.md 支持,以及会话旁边的 /diff 面板。这些功能的源码和测试放在公开的 anthropics/claude-code 仓库的 mods/ 目录下,你可以看看团队是怎么做的。
做你的第一个 Mod:Token Weather
Token Weather 会在每轮结束后读取上下文窗口的使用情况,然后在输入框上方画出一行信息:天气图标、使用百分比、已用 token 数与窗口容量、最近几轮的小图表,以及上一轮增加了多少用量。
|
|
|
|---|---|
|
|
|
|
|
|
|
|
|
|
|
|
|
|
|
下面是真实会话里的样子。每轮都读取更多文件,状态条逐渐填满,从 ☀ 晴天变成 ☂ 阵雨,再变成 ☇ 暴风雨:

视频预览:图 C:Token Weather 在完整终端会话中运行三轮,200k 上下文窗口的使用率依次为 18%、67% 和 81%
捷径:让 Claude 帮你做
你可以跳过下面的六个步骤。Claude Code 知道怎么写 Mods,所以只要描述你想要的功能,让它来完成即可。用 claude 启动一个会话,粘贴下面这段提示词:
提示词中文对照:
帮我做一个名为 token-weather 的 Claude Code Mod:实时显示上下文窗口的天气预报,放在输入框上方的状态条里。
一行显示这些内容:
- 用天气图标和文字表示上下文窗口的使用程度:低于 25% 是黄色的 ☀ 晴天;25–49% 是青色的 ☁ 多云;50–74% 是蓝色的 ☂ 阵雨;75–89% 是品红色的 ☇ 暴风雨;90% 及以上是红色的 ↯ 即将需要压缩上下文。
- 已使用百分比,以及已用 token 数和窗口容量,例如“134.4k / 200k”。
- 用 ▁▂▃▄▅▆▇█ 绘制最近 12 轮的小图表。
- 上一轮增加的用量,例如“▲ +98.3k last turn”。
每轮结束后都要更新。
可直接粘贴的原文提示词:
Make me a Claude Code mod called token-weather: a live forecast of my context window, shown in the band above the prompt.

What it should show, on one line:
- A weather icon and word for how full the context window is: under 25% ☀ Clear (yellow), 25–49% ☁ Cloudy (cyan), 50–74% ☂ Showers (blue), 75–89% ☇ Storm (magenta), 90% and up ↯ Compact soon (red).
- The percentage used, then the tokens used out of the window, like "134.4k / 200k".
- A small chart of the last 12 turns, drawn with ▁▂▃▄▅▆▇█.
- How much the last turn added, like "▲ +98.3k last turn".

It should update after every turn.
Claude 会问你一次,是否要为当前会话开启热重载。允许之后,等 Claude 这一轮结束,状态条就会出现在输入框上方。此后,每次修改都会原地重新加载,你可以继续提出调整,比如“让暴风雨从 70% 开始”“在最后加上美元费用”,然后看着状态条变化。这个 Mod 只在当前会话中加载,它的文件夹之后会被清理。想留下它,就把文件夹复制出去,像安装普通插件一样安装它,具体见第 6 步。
注意,这段提示词只描述了你想看到什么。写一个 Mod,不需要先懂 API。Claude Code 内置的 Mods 编写指南负责解决“怎么做”:状态放在哪里才能在重载后保留,如何用 claude plugin validate 检查插件,以及该挂接哪些事件。改一改“要显示什么”下面的要求,这就成了你的 Mod,而不是我们的。
如果你更想先看看它是怎么搭起来的,或者想检查 Claude 写出的代码,就继续往下读。
第 1 步:创建文件夹
先确认 Claude Code 的版本足够新:
claude --version # 2.1.287 or later创建下面的目录结构:
token-weather/
├── .claude-plugin/
│   ├── plugin.json
│   └── types/            (written by Claude Code when it loads the mod)
├── hooks/
│   ├── hooks.json
│   └── token-weather.mjs
├── types/
│   └── index.d.ts        (added in step 3)
└── tests/
    └── token-weather.test.ts   (added in step 5)
.claude-plugin/plugin.json 是标准的插件清单:
{
  "name": "token-weather",
  "version": "0.1.0",
  "description": "A live forecast of the context window, drawn above the prompt.",
  "author": { "name": "You" }
}
hooks/hooks.json 指向模块。一个 Mod 恰好只有一个模块:
{
  "modules": ["./token-weather.mjs"]
}
第 2 步:先画点东西
输入框正上方的区域是一个名为 AbovePrompt 的组件。Claude Code 自己不会在那里绘制内容,因此很适合作为第一个目标。挂接它的 ui.render 事件,返回一棵元素树:
// hooks/token-weather.mjs
export function register(on) {
  on("ui.render", { component: "AbovePrompt" }, ($, e, next) => {
    const { Box, Text } = $.ui.resolve(e);
    return Box({
      paddingX: 1,
      children: [Text({ color: "yellow", bold: true, children: "☀  Clear skies" })],
    });
  });
}这些元素不是全局变量。$.ui.resolve(e) 会返回当前渲染界面支持的构造函数,因为 Claude Code 的不同界面所支持的元素集合略有不同。也可以用 JSX,把 h 设为工厂函数即可。
加载插件并启动会话:
claude --plugin-dir ./token-weather输入框上方会出现“☀ Clear skies”。保持会话打开。Claude Code 会监听这个文件夹,每次保存都会原地重新加载模块,不需要重启。这种快速反馈,是写 Mods 的乐趣所在。
提示:熟悉这种写法之后,就可以像前面的捷径那样,向 Claude 描述下一个 Mod。它会把插件写进一个文件夹,在同一个会话里热重载。
第 3 步:读取真实用量,并存进 $.state
$.session.usage() 返回的数据和状态栏相同。context.tokens 是生成上一条回复时所依据的输入 token 数,context.window 是模型的上下文窗口容量,context.percent 是前者相对于后者的比例。这个调用不产生费用:只有你要求详细分项时,它才会发送 token 计数请求。
在会话启动时,以及每轮结束后,读取一次数据:
on("session.start", async ($, e, next) => {
  const result = await next(e);
  await takeReading($);
  return result;
});

on("turn.complete", async ($, e, next) => {
  const result = await next(e);
  if (!e.agentId) {
    await takeReading($); // main-loop turns only, not subagents
  }
  return result;
});
这两个钩子都先调用 next(e),然后再观察结果。它们都不会改变原有行为。
读数存在哪里? 在模块层级写一个 let readings = [] 看起来很自然,但热重载相当于重新加载:register 会再次运行,session.start 会再次触发,模块变量也会重新开始。应该把历史记录放进 $.state。它在宿主中保存具名的值,贯穿整个会话,重载也不会丢失。
// Held by the host, so the history survives a hot reload of this file.
const readings = { plugin: "token-weather", key: "readings" };

async function takeReading($) {
  const { context } = await $.session.usage();
  if (!context?.window) return;
  const tokens = context.tokens ?? 0;
  const percent = context.percent ?? Math.round((tokens / context.window) * 100);
  const { value: history = [] } = await $.state.get(readings);
  await $.state.set(readings, [...history, { tokens, window: context.window, percent }].slice(-HISTORY));
}
状态值需要在插件的类型契约中声明。这个契约是一个由清单指向的小型 .d.ts 文件。添加 types/index.d.ts:
export type TokenWeatherReading = { tokens: number; window: number; percent: number };

declare module "claude-code" {
  interface PluginState {
    "token-weather": { readings: TokenWeatherReading[] };
  }
}
然后在 plugin.json 里加上 "types": "./types/index.d.ts"。如果跳过这一步,claude plugin validate 就会报错并指出修复方法:token-weather.readings 尚未声明,清单所指向的类型契约必须在 interface PluginState { … } 中声明它。
这样还能顺带获得自动重绘:渲染钩子执行期间调用 $.state.get,就会为当前绘制建立订阅。此后每次 $.state.set 都会让状态条重新绘制,你不需要调用 $.ui.invalidate。
第 4 步:画出天气预报
下面是完整模块:
// Token Weather: a live forecast of the context window, above the prompt.

const HISTORY = 12;
const BARS = "▁▂▃▄▅▆▇█";
const FORECAST = [
  { upTo: 25, icon: "☀", word: "Clear", color: "yellow" },
  { upTo: 50, icon: "☁", word: "Cloudy", color: "cyan" },
  { upTo: 75, icon: "☂", word: "Showers", color: "blue" },
  { upTo: 90, icon: "☇", word: "Storm", color: "magenta" },
  { upTo: Infinity, icon: "↯", word: "Compact soon", color: "red" },
];

// Held by the host, so the history survives a hot reload of this file.
const readings = { plugin: "token-weather", key: "readings" };

export function register(on) {
  on("session.start", async ($, e, next) => {
    const result = await next(e);
    await takeReading($);
    return result;
  });

  on("turn.complete", async ($, e, next) => {
    const result = await next(e);
    if (!e.agentId) {
      await takeReading($); // main-loop turns only, not subagents
    }
    return result;
  });

  on("ui.render", { component: "AbovePrompt" }, async ($, e, next) => {
    const { value: history = [] } = await $.state.get(readings);
    if (e.props.hasSurvey || history.length === 0) {
      return next(e);
    }
    const { Box, Text } = $.ui.resolve(e);
    return band(Box, Text, history, e.props.bodyColumns);
  });
}

async function takeReading($) {
  const { context } = await $.session.usage();
  if (!context?.window) return;
  const tokens = context.tokens ?? 0;
  const percent = context.percent ?? Math.round((tokens / context.window) * 100);
  const { value: history = [] } = await $.state.get(readings);
  await $.state.set(readings, [...history, { tokens, window: context.window, percent }].slice(-HISTORY));
}

function band(Box, Text, history, columns) {
  const now = history[history.length - 1];
  const f = FORECAST.find((b) => now.percent < b.upTo);
  const parts = [
    Text({ color: f.color, bold: true, children: `${f.icon}  ${f.word}` }),
    Text({ children: `  ${now.percent}% of context` }),
    Text({ dimColor: true, children: `  ${short(now.tokens)} / ${short(now.window)}` }),
  ];
  if (columns >= 60) {
    parts.push(Text({ dimColor: true, children: "   last turns " }));
    parts.push(Text({ color: f.color, children: sparkline(history) }));
    if (history.length > 1) {
      parts.push(Text({ dimColor: true, children: trend(history) }));
    }
  }
  return Box({ flexDirection: "row", paddingX: 1, children: parts });
}

function sparkline(history) {
  const top = Math.max(...history.map((r) => r.tokens), 1);
  return history.map((r) => BARS[Math.floor((r.tokens / top) * (BARS.length - 1))]).join("");
}

function trend(history) {
  const delta = history[history.length - 1].tokens - history[history.length - 2].tokens;
  if (delta === 0) return "  steady";
  return delta > 0 ? `  ▲ +${short(delta)} last turn` : `  ▼ ${short(-delta)} last turn`;
}

function short(n) {
  if (n >= 1_000_000) return `${+(n / 1_000_000).toFixed(1)}M`;
  if (n >= 1_000) return `${+(n / 1_000).toFixed(1)}k`;
  return String(n);
}
有三个细节值得带到你自己的 Mod 里:
-
组件的 props 在 e.props上。hasSurvey表示有一个调查提示需要使用这块区域,此时钩子应调用next(e)让出位置。bodyColumns是状态条的实际宽度;会话旁边停靠了面板时,它会比终端宽度更窄。元素树要按这个宽度布局。只有e.component、e.surface、e.requestId和e.viewport位于e的顶层。 -
没有内容可画时,就交给下一环。返回 next(e),把这块区域还给 Claude Code 和其他 Mods。 -
使用单列宽字符,不要用 emoji。☀ ☁ ☂ ☇ ↯ 在各种终端字体中都能对齐。
保存文件,正在运行的会话就会加载它。经过几轮读取大文件的操作,状态条会从晴天走向阵雨,再走向暴风雨,就像本节开头的录屏一样。
第 5 步:校验与测试
claude plugin validate 会以 Claude Code 实际加载时相同的方式,读取清单和模块源码,并报告模块挂接了哪些事件、调用了哪些接口:
$ claude plugin validate ./token-weather
  > types ./types/index.d.ts declares state: token-weather.readings
  > ./token-weather.mjs hooks: session.start, turn.complete, ui.render{component=AbovePrompt}
  > ./token-weather.mjs calls: $.session.usage (via takeReading), $.state.get, $.state.set (via takeReading), $.ui.resolve
  > ./token-weather.mjs state writes: token-weather.readings
  > ./token-weather.mjs state reads: token-weather.readings
√ Validation passed
claude plugin test 会在真实的 Claude Code 运行时中执行插件的 *.test.ts 文件。测试通过 on 注册的钩子,在链条中的位置位于 Mod 之后,用来替代 Claude Code 原本的回答。因此,你可以精确控制 $.session.usage() 返回什么:
// tests/token-weather.test.ts
import { describe, expect, test } from "claude-code/testing";

describe("token-weather", () => {
  test("the band follows the context window", async ($, on) => {
    // Hooks registered here run after the mod and stub what Claude Code would answer.
    let tokens = 36_100;
    on("session.start", ($, e) => ({ cwd: e.cwd }));
    on("session.usage", () => ({
      value: { startedAt: 0, rateLimits: [], context: { tokens, window: 200_000, percent: Math.round(tokens / 2_000) } },
    }));
    on("turn.complete", () => ({ text: "" }));

    await $.session.start({ surface: "terminal", isInteractive: true, cwd: "/work" } as any);
    const ui = await $.ui.mount({
      plugin: "token-weather",
      surface: "terminal",
      component: "AbovePrompt",
      props: { hasSurvey: false, isWorking: false, maxRows: 10, bodyColumns: 120 },
    } as any);
    expect(await ui.find({ type: "Text", text: /Clear/ })).toBeDefined();

    tokens = 134_400;
    await $.turn.complete({ reason: "answer", answer: "ok", durationMs: 1 } as any);
    expect(await ui.find({ type: "Text", text: /Showers/ })).toBeDefined();
    expect(await ui.find({ type: "Text", text: /67% of context/ })).toBeDefined();
    expect(await ui.find({ type: "Text", text: /▲ \+98\.3k last turn/ })).toBeDefined();
    await ui.unmount();
  });
});
$ claude plugin test ./token-weather
(pass) token-weather > the band follows the context window
1 pass
0 fail这个测试也检查了第 3 步中的重绘行为:turn.complete 之后,状态条会自动更新,Mod 从未主动请求重绘。
第 6 步:分享出去
Mod 本身就是插件,因此分发方式也一样。把它放进一个 marketplace(插件市场)即可。最简单的市场,就是一个带有 .claude-plugin/marketplace.json 的文件夹:
{
  "name": "my-mods",
  "owner": { "name": "You" },
  "plugins": [{ "name": "token-weather", "source": "./token-weather" }]
}
claude plugin marketplace add ./my-mods
claude plugin install token-weather@my-mods --scope user分享你的 Mod
Mod 是 Claude Code 插件,所以分享方法与任何其他插件都一样,不需要再学一套新流程。把 Mod 和市场文件一起放到 GitHub 仓库,这个仓库就成了你的插件市场。任何人都能从中安装,你用普通的 push 就能更新。
在 Claude Code 中安装,只需要三条命令:
/plugin marketplace add your-org/my-mods
/plugin install token-weather@my-mods
/reload-plugins
重新加载时,Mod 就会启动。如果没有出现,重启 Claude Code。
Mod 是在你机器上的 Claude Code 内部运行的代码,拥有与 Claude Code 相同的访问权限。代码来自它的发布者,而不一定来自 Anthropic。因此,安装 Mod 应该像安装软件包一样:先读仓库,只安装可信的人发布的内容。只有你运行安装命令后,才会真正安装。
Claude 插件目录也接受包含 Mods 的插件。你可以通过目录的管理页面提交,让其他人不需要拿到你发的链接,也能找到它。
再看两个 Mod
Token Weather 只负责观察和绘制。接下来这两个 Mod 会介入事件、打开面板,并接收用户输入。
Blast Radius:危险命令运行前,先看它会改动什么
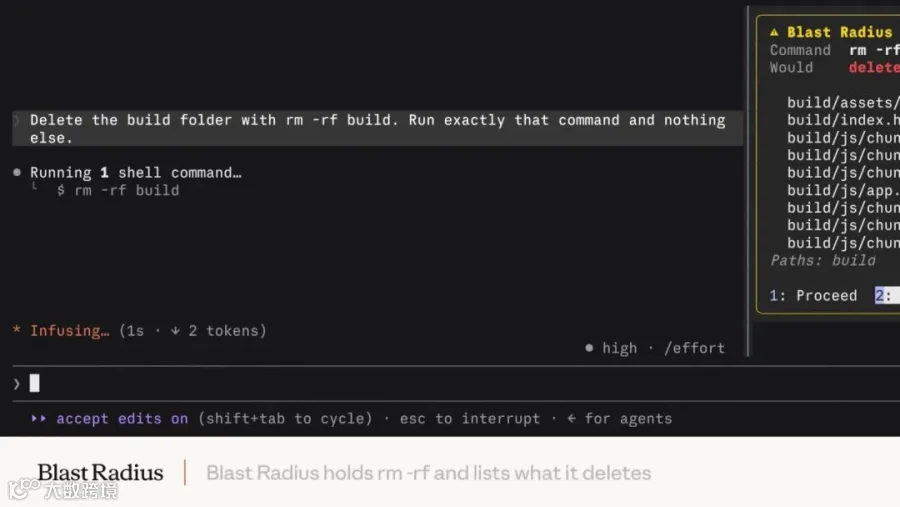
当 Claude 通过 Bash 调用 rm -rf、git reset --hard、git clean、强制 push 或数据库迁移时,Blast Radius 会先挂起调用。它分析命令会影响哪些内容,然后打开带有 Proceed(继续)和 Cancel(取消)选项的面板。按 2,Claude 会收到拒绝信息及原因;按 1,命令就会按原样执行。

视频预览:图 D:Blast Radius 挂起 rm -rf build,列出将被删除的 9 个文件,共 1.1 MB;选择 Cancel 拒绝执行,第二次尝试时选择 Proceed 执行
它用了三个钩子:Bash 的 tool.call,以及 Pane 和 AbovePrompt 的 ui.render。核心就是前面表格中的“直接回答”:
on("tool.call", { tool: "Bash" }, async ($, e, next) => {
  const risk = classify(String(e.command ?? ""));
  if (risk === null) return next(e);                 // everything else runs as normal

  const report = await measure($, risk, await $.session.cwd());  // git status, git clean -n, du, ...
  held = { command: e.command, risk, report, decision: null };
  const opened = await $.ui.open({ id: "blast-radius", title: "Blast Radius", focus: true });
  if (!opened.isPlaced) held.where = "band";         // too narrow for a pane: draw above the prompt

  while (held.decision === null && !next.signal.aborted) {
    await $.process.run(["sleep", "0.25"]);          // time inside $ calls doesn't count against the hook's time limit
  }
  if (held.decision === "proceed") return next(e);   // let it run
  return { deny: `Blast Radius held this command: the user pressed Cancel. It would have: ${report.summary}.` };
});
这个例子可以学到:
-
用 $.process.run做 dry run。报告来自工具自身的命令,例如git status --porcelain、git clean -n、git log HEAD..origin/main和showmigrations。参数以 argv 数组传入,因此路径中的内容不会被当成 shell 代码执行。 -
挂起一次调用。每次分派事件时,钩子有 10 秒的自身执行时间,但等待 $调用的时间不计入其中。循环通过短暂的 sleep 进程等待,直到按钮的onPress设置决定;如果next.signal被中止,也就是你按下 Esc,它就会停止等待。 -
带快捷键的按钮。 Button({ label: "Proceed", hotkey: "1", onPress })可以点击,也可以用 Tab 和 Enter,或直接按数字键操作。 -
退回到状态条。终端足够宽时,面板会停靠在会话旁边。如果 $.ui.open返回isPlaced: false,同一份报告就会画在输入框上方:

图 E:终端宽度为 120 列时,Blast Radius 在输入框上方显示 git reset --hard 的影响报告
它是一张安全网,不是权限系统。它读取的是命令文本,因此 $(…)、别名,以及内部调用 rm 的脚本,都能绕过它。需要硬性禁止时,应使用权限规则。
Replay Theater:逐步回看上一轮的修改
一轮运行期间,Replay Theater 会记录每一次 Edit 和 Write 调用:文件,以及修改前后的文本。该轮结束后,输入框上方会出现提示。按 r,或输入 /replay,就能打开面板,一次查看一个 diff。上方有编号步骤条,下面有 Prev(上一步)、Next(下一步)和 Close(关闭)按钮。
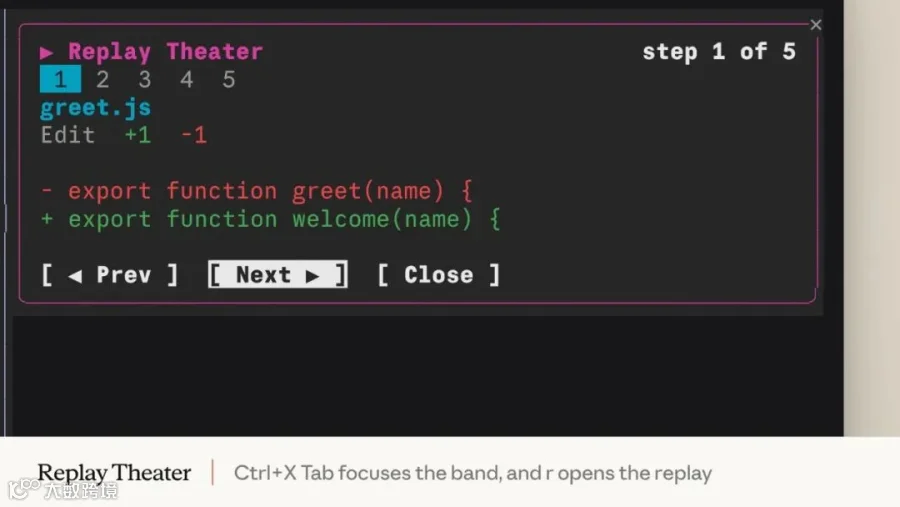
视频预览:图 F:Replay Theater 在跨 3 个文件、包含 5 次编辑的重命名完成后显示提示,再在面板中逐步回放第 1 到第 5 次编辑
它从不阻止或改变编辑,只负责观察:
on("tool.call", async ($, e, next) => {
  if (EDIT_TOOLS.has(e.tool)) state.pending.push(...(await stepsFor($, e)));  // old/new text → diff
  return next(e);                                                              // the edit runs untouched
});

on("turn.start", ($, e, next) => { if (!e.agentId) state.pending = []; return next(e); });

on("turn.complete", async ($, e, next) => {
  const r = await next(e);
  if (!e.agentId && state.pending.length) state.replay = state.pending;       // one replay per turn
  return r;
});

on("session.start", async ($, e, next) => {
  const r = await next(e);
  await $.command.register({ name: "replay", description: "Step through the last turn's file edits" });
  return r;
});
on("command.run", { command: "replay" }, async ($, e) => ({ text: (await openReplay($)) ? "Replaying" : "No edits" }));
这个例子可以学到:
-
配对事件。 turn.start和turn.complete把编辑归入同一轮回放,e.agentId用来排除子 Agent 的轮次。 -
注册斜杠命令。在 session.start中调用$.command.register,再通过command.run回答这个命令。 -
读取文件。遇到 Write 时, $.fs.read会在写入真正发生之前读取旧内容,因此 diff 来自真实的前后差异。 -
位置由界面决定。全屏时,面板停靠在右侧;宽度为 80 列时,它内嵌在输入框上方。无论哪种位置,Mod 绘制的都是同一棵元素树。

图 G:终端宽度为 80 列时,Replay Theater 内嵌在输入框上方
四个值得保留的习惯
-
善用 Claude Code 为你生成的类型。每次加载 Mod,Claude Code 都会把当前版本的声明写进该 Mod 的 .claude-plugin/types/文件夹,编辑器和tsc -p无需额外操作就能使用。这些声明是每个事件、$上每个方法,以及每个元素 props 的参考。 -
从 e.props读取 props。hasSurvey、bodyColumns等属性都在那里,而不是直接放在e上。 -
为热重载做好准备。每次保存都会再次运行 register和session.start,因此数据应保存在$.state中,而不是模块变量里。 -
界面没出现时,先看日志。运行 claude --debug,查找提示某个钩子返回的元素树未通过校验的日志行。
你想做什么 Mod?
这里的三个 Mod,分别来自一个问题:上下文用了多少?这条命令接下来要删什么?Claude 刚刚改了什么?你的问题会不一样,这正是 Mods 的意义。可以从下面这些点子开始:
-
利用 $.session.usage()做费用或速率限制仪表,通过$.ui.status显示在状态栏中。 -
挂接 prompt.submit,把团队约定加入每一条提示词。 -
做一个面板,列出 Claude 在当前会话中读过的文件,实时展示它已经看过什么。 -
做一个专注计时器,在耗时较长的一轮结束时,用 $.ui.toast发出提示。 -
为你的技术栈定制 tool.call防护,例如针对生产环境的 kubectl context 或terraform apply。
把你做的东西分享出来
做出了一个每天都在用的 Mod?把它运行时的 GIF 或截图发到 X 或 LinkedIn,让其他开发者看到它能做什么。把插件放进市场中,具体见“分享你的 Mod”,再附上链接。喜欢它的人就能用三条命令安装。
参考链接
-
原文:https://claude.dev/blog/getting-started-with-claude-code-mods/ -
Claude Code 仓库与 mods 源码:https://github.com/anthropics/claude-code -
插件目录提交入口:https://claude.ai/directory/manage